Halloween has a funny way of making even the smallest beauty detail feel like part of the costume. But do you really need elaborate props, dramatic makeup, or a full black wardrobe to get into the mood? I think not. A carefully chosen manicure can bring just enough mystery, humor, or autumnal drama to your look while still feeling wearable.
For Halloween nail art 2026, I’m especially drawn to designs that balance recognizable spooky details with flattering shapes and polished finishes. Think tiny bats, ghosts, pumpkins, spiderwebs, moons, playful characters, and warm seasonal colors – but styled in a way that feels intentional rather than overly busy. Whether you prefer short nails or long almond tips, there is plenty of room to have fun.
Pink Halloween Nails With Playful Spiders And Bats
I love how this manicure takes a soft pink base and turns it into something unexpectedly spooky. The nails have a glossy, delicate pink finish, while selected accent nails carry black-and-white Halloween illustrations. There is a tiny spider stretching across one nail, striped hearts on another, flying bats and stars on a third, and a little ghostly character paired with black details toward the tips. The result feels playful rather than frightening, which makes it one of my favorite directions for cute seasonal beauty. For anyone searching for halloween nail art ideas that do not feel too dark, this balance is spot-on.
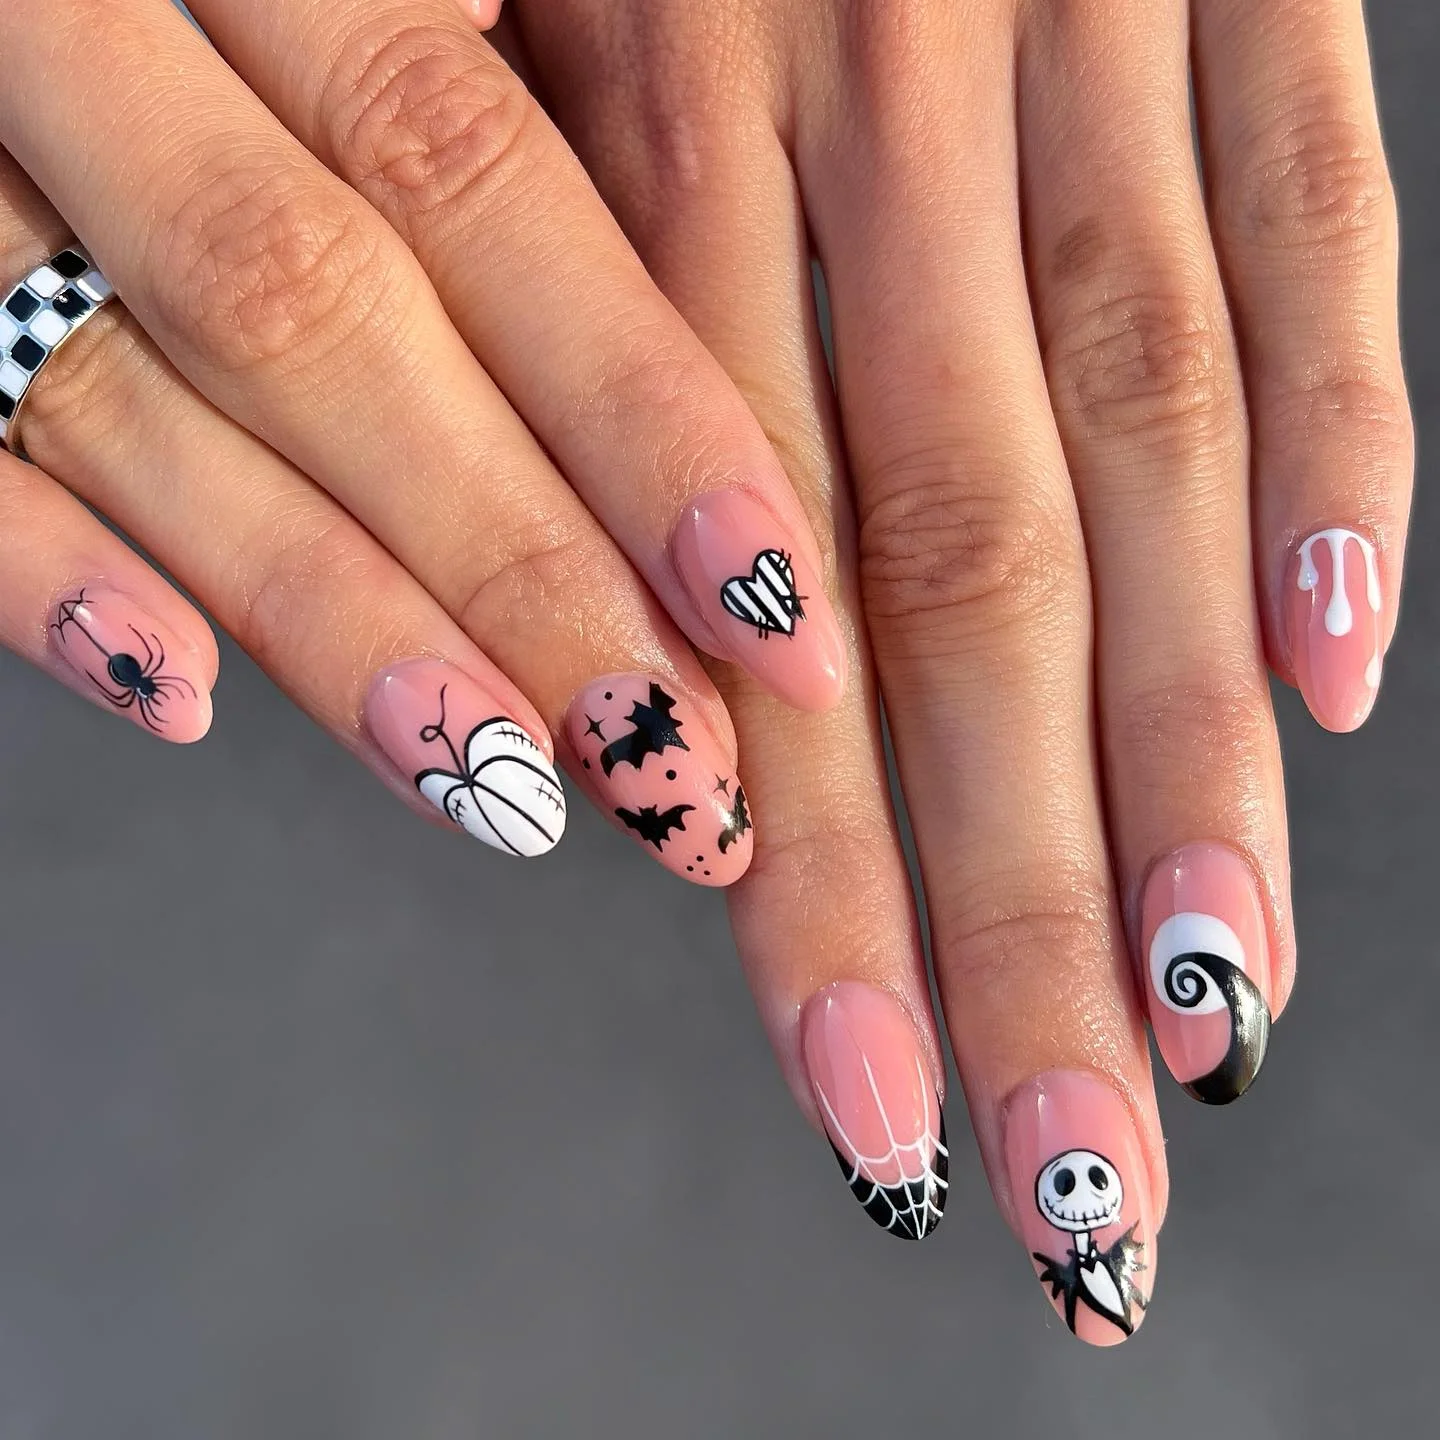
I would keep the base close to a sheer blush pink so the illustrations remain the stars. A shade such as OPI Bubble Bath or a similar milky pink works beautifully, while black, white, and a tiny amount of silver can create the artwork. A fine liner brush is essential for spider legs, bat wings, tiny stars, and web-like details. For the glossy finish, I would seal everything with a high-shine top coat rather than adding unnecessary texture.
At home, I would start with a clean rounded-almond or oval shape and apply two thin layers of pink polish. Once completely dry, I would sketch the larger motifs first and then add the tiny lines and dots. The trick is restraint – not every nail needs a full illustration. If detailed painting feels intimidating, this can easily become halloween nail art easy by using one or two accent nails and simple black silhouettes on the others.
This is the kind of manicure I could wear with a black sweater, a satin skirt, or even a simple pair of jeans without feeling like I’m wearing a costume. The soft pink keeps everything surprisingly elegant. And honestly, that little spider is exactly the sort of unexpected detail that makes me look twice.
Black And Burnt Orange Nails With Haunted Silhouettes
When I want Halloween nails to feel moodier, I immediately reach for black and burnt orange. This design combines glossy black almond-shaped nails with glowing orange accent nails covered in black bats and curling, tree-like silhouettes. Tiny amber rhinestones add a warm point of light to several black nails, giving the manicure a slightly mysterious, almost candlelit quality. It is a strong example of halloween nail art designs that lean into the traditional Halloween palette without becoming predictable.
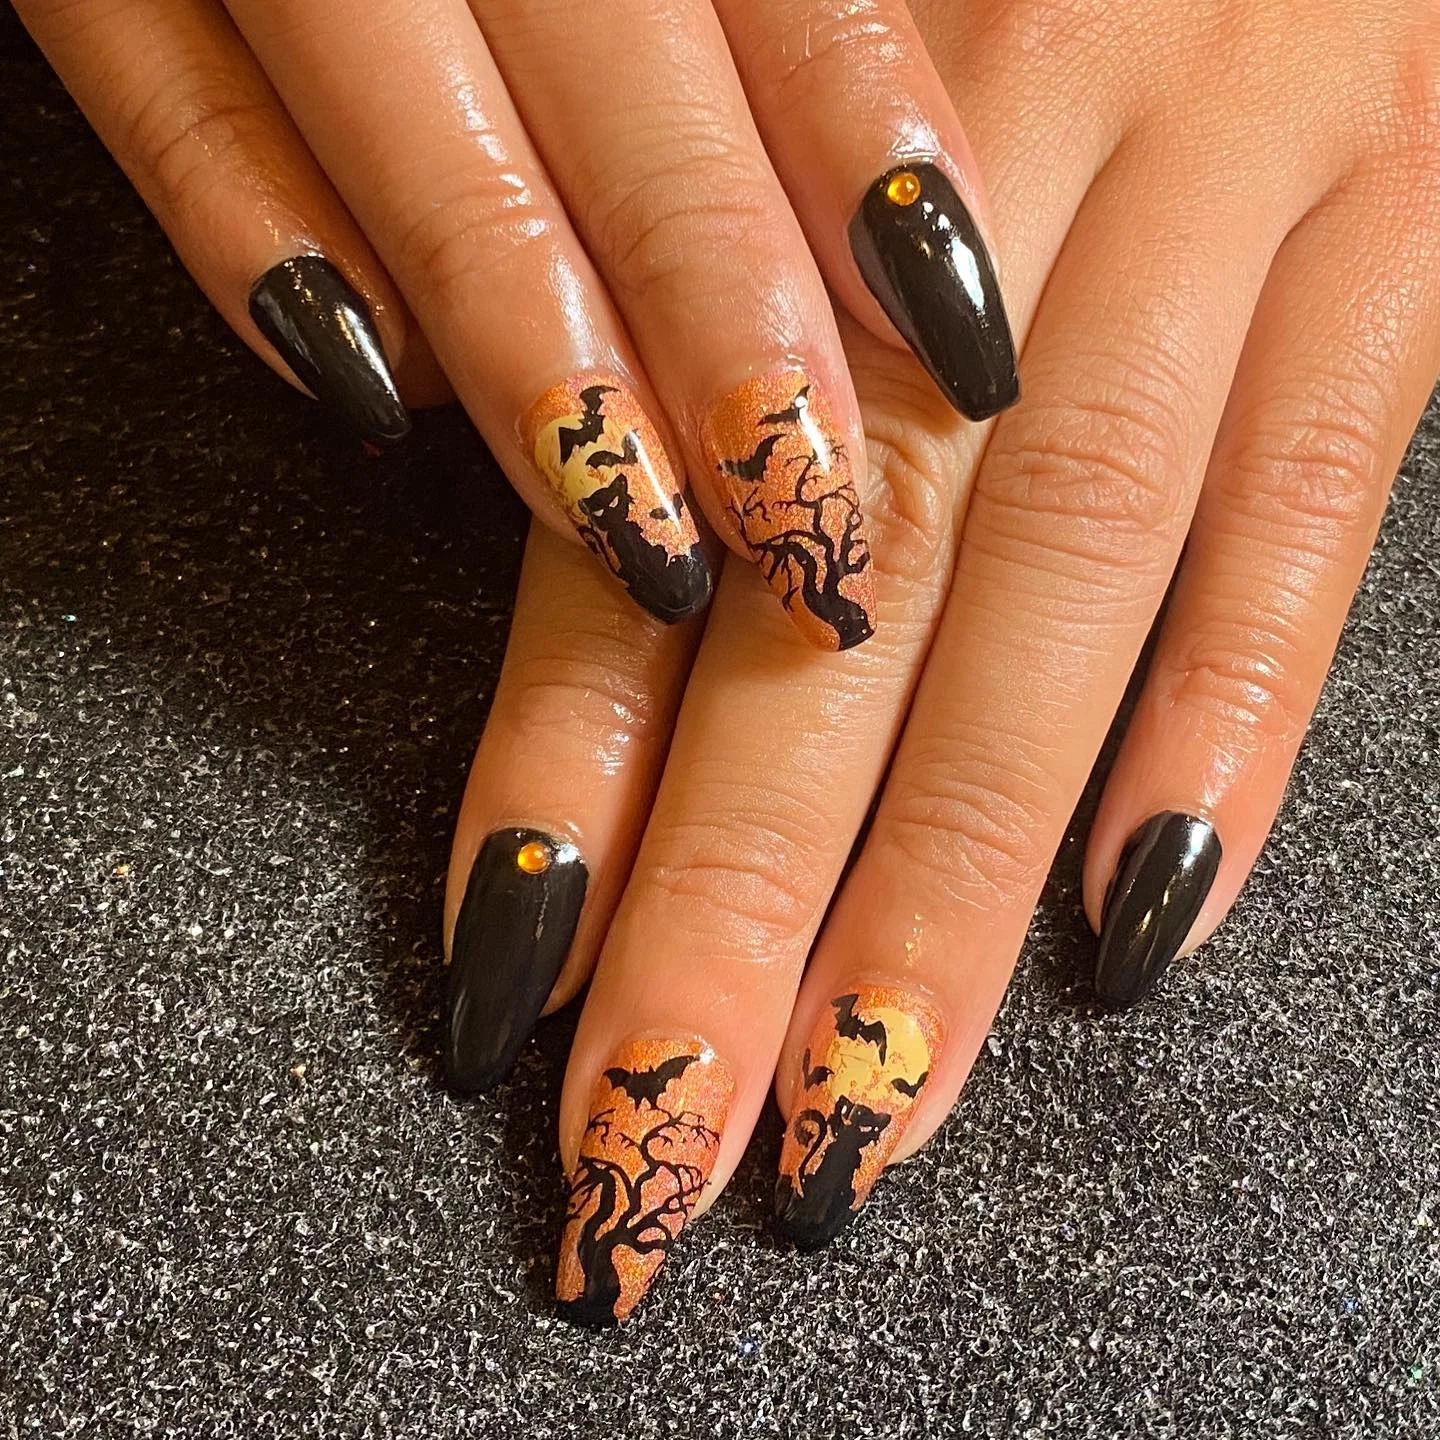
For this look, I would choose a rich black polish with an extremely glossy finish, a metallic orange or copper shimmer, and a warm pumpkin-toned polish for the glowing accents. A fine detail brush makes it easier to draw the bats and branching silhouettes, while small amber crystals or gold-toned rhinestones provide the final sparkle. The contrast matters here: the black should look deep and polished, while the orange needs enough warmth to resemble Halloween candlelight.
I would shape the nails into a tapered almond first, because the elongated silhouette works beautifully with vertical branches and bat motifs. After applying the orange base to the accent nails, I would add irregular black branches from the sides and place bats between them. The rhinestones should stay minimal – one tiny stone can do more than a handful when the rest of the manicure is already dramatic.
For me, this is the manicure that belongs with October evenings. It has that first-cold-night feeling, when the air changes and suddenly a black coat feels exciting again. If you usually gravitate toward sophisticated manicures but still want a seasonal moment, this version gives you Halloween without sacrificing polish.
Midnight Purple Nails With Ghostly Halloween Characters
Deep purple makes an excellent alternative to black when I want a manicure to feel mysterious but slightly softer. Here, a glossy midnight-purple base creates the backdrop for pale gray-white accents, tiny bats, pumpkins, stitched details, and playful Halloween characters. One of the most charming elements is the little character artwork, which gives the manicure a storybook quality rather than relying only on traditional symbols. This is where halloween nail arts can become genuinely creative – each nail contributes another tiny piece of the theme.
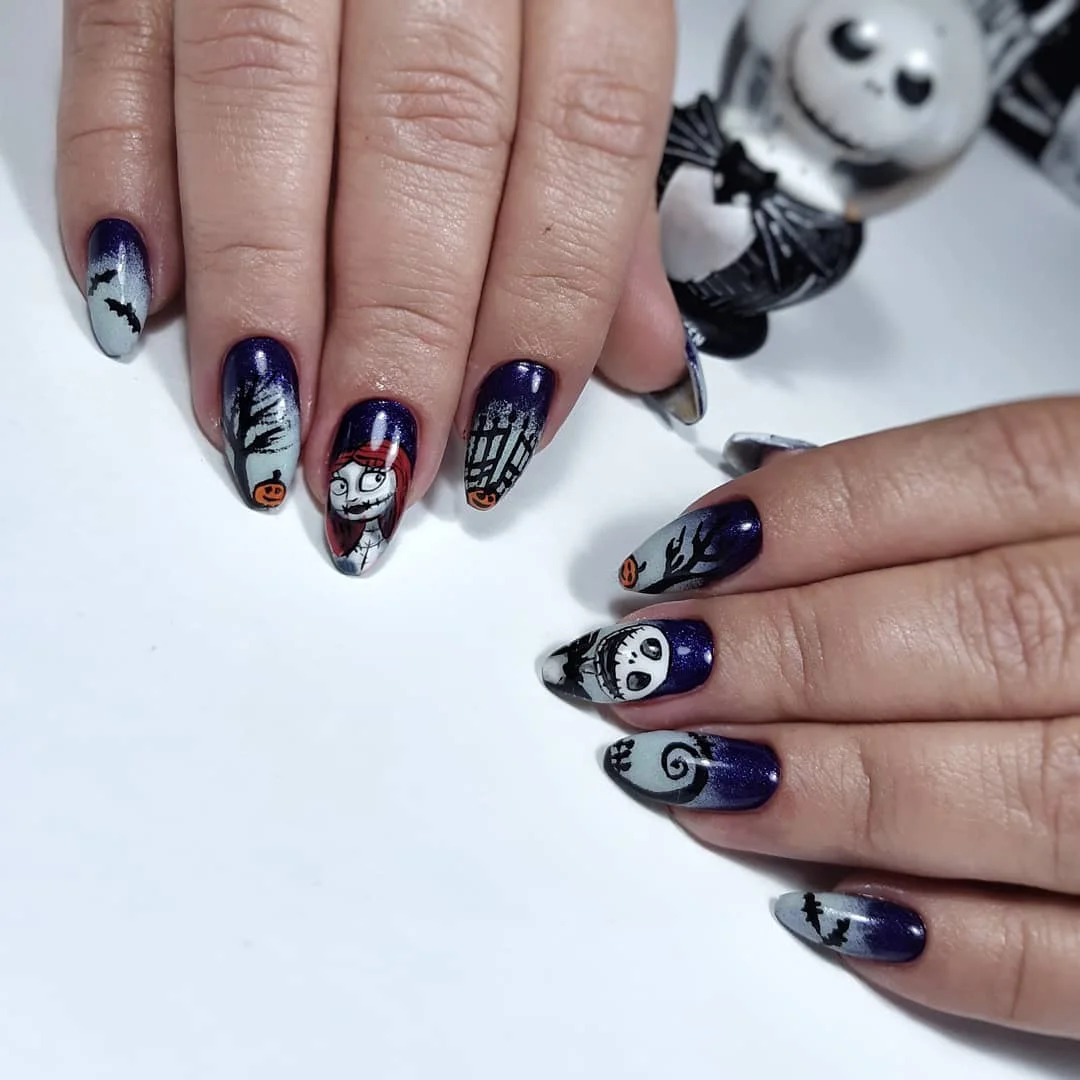
I would use a deep navy-purple or blackened violet as the main shade and pair it with cool white, soft gray, black, and a tiny pumpkin orange. The glossy purple base is important because it gives the design depth under artificial light. For the illustrations, a micro-detail brush and dotting tool are enough for most of the faces and miniature accents. A good top coat will also smooth the layered artwork and make the colors look richer.
The easiest way to recreate this at home is to work from large shapes to tiny details. I would paint the purple background first, then add the pale areas for faces and silhouettes, allowing each layer to dry before outlining it in black. Small orange dots can suggest pumpkins without requiring complicated artwork. If you want halloween nail art simple enough for a beginner, keep the character on one statement nail and turn the remaining nails into simple purple-and-white accents.
I particularly like this approach for anyone who has outgrown overly literal Halloween manicures. It still feels festive, but the deep purple gives it a more fashion-forward edge. Add a black cardigan, silver jewelry, and a dark berry lip, and suddenly the whole thing feels very intentional.
Retro Orange Halloween Nails With Graphic Details
This manicure takes a completely different route and leans into vivid orange, cream, black, and shimmering gold. The almond nails feature graphic checkerboard patterns, sweeping curved lines, stars, pumpkin-inspired details, and a playful black-and-white character. One nail is covered in warm metallic shimmer, while others combine orange with crisp geometric shapes. For me, this is one of the strongest halloween nail art designs easy to personalize because the individual elements can be mixed and matched rather than copied exactly.
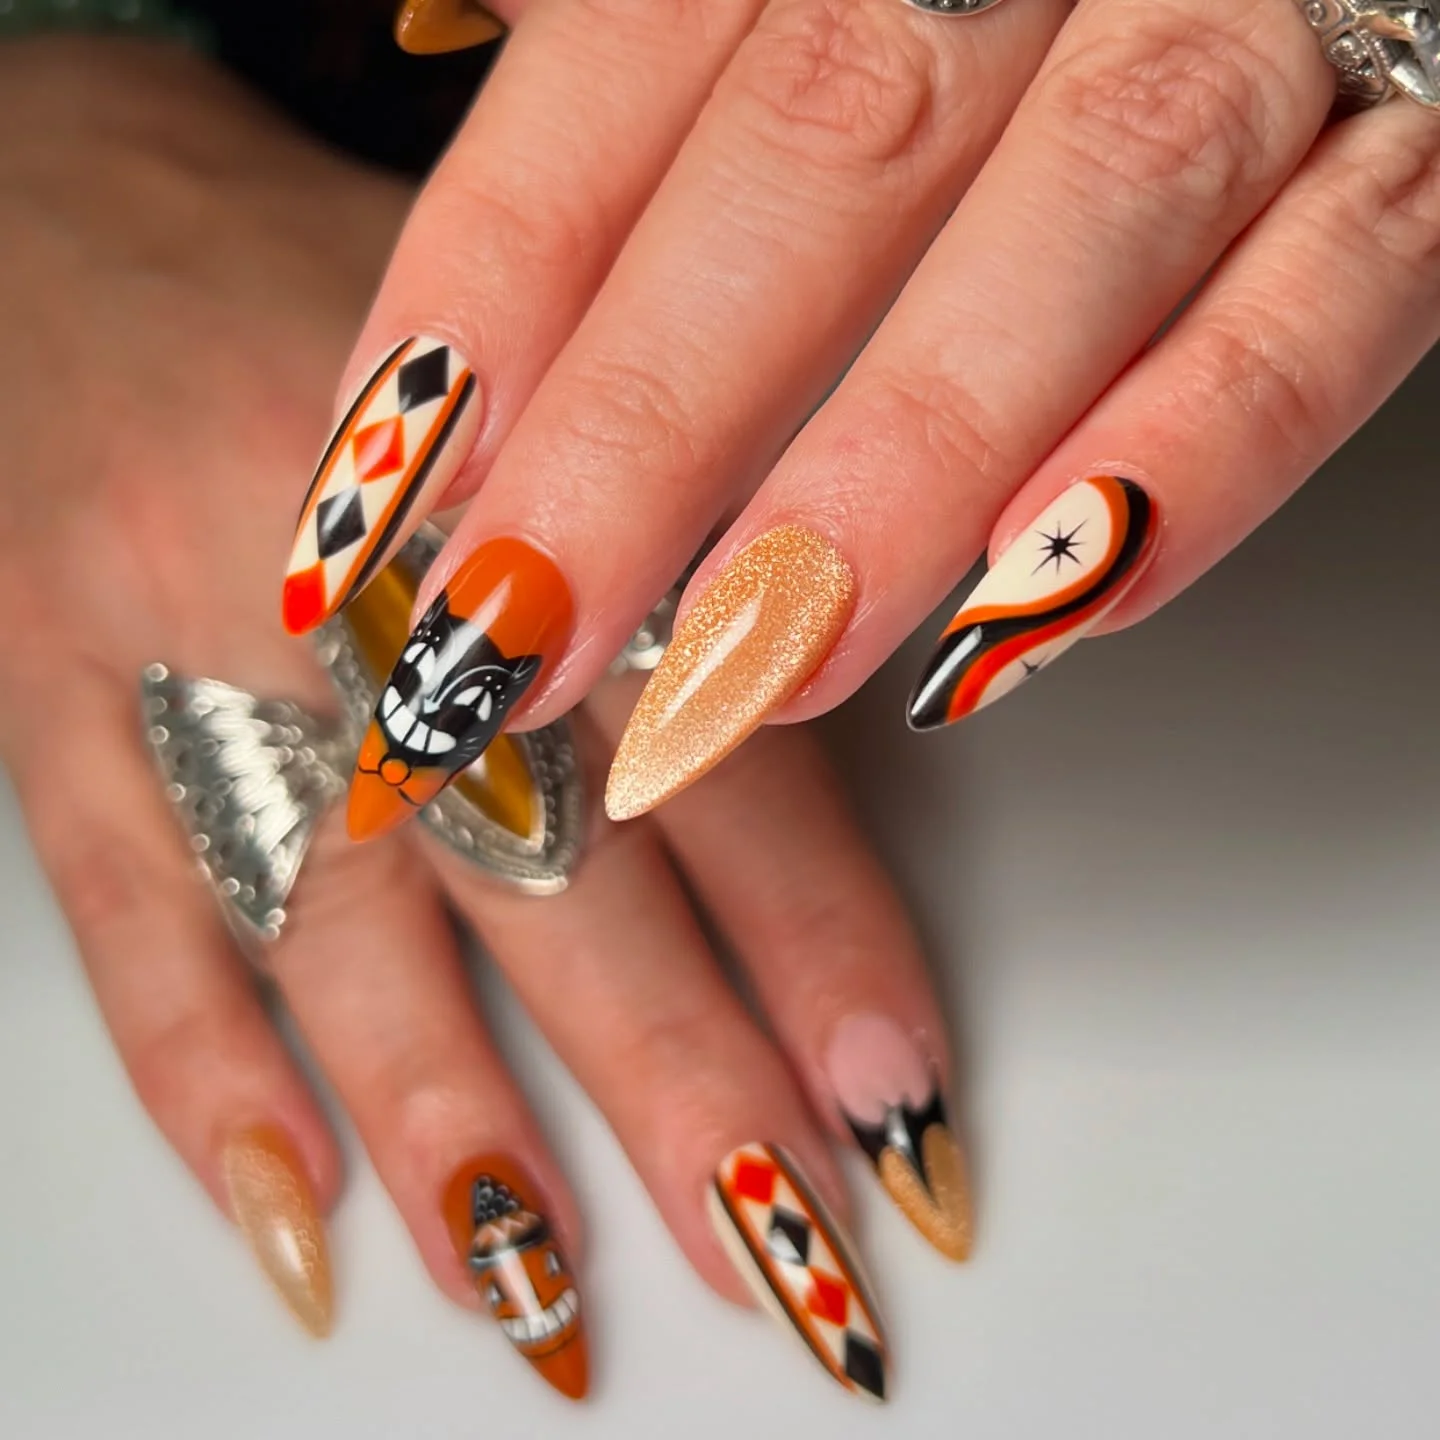
I would build the palette around pumpkin orange, creamy ivory, glossy black, and metallic copper or gold. A thin striping brush is useful for the curved lines and checkerboard pattern, while a small detail brush handles the character and star. If the metallic orange is difficult to paint evenly, a fine shimmer polish or chrome powder over a warm base can create a similar effect. The overall finish should stay glossy so the orange and metallic accents catch the light.
At home, I would not try to reproduce every detail on every nail. Instead, I’d choose three design categories: one graphic nail, one character nail, and one metallic nail. The remaining nails can use solid orange or gold. This makes the manicure much more approachable and turns a complicated-looking halloween nail art tutorial into something I could realistically attempt on a quiet evening.
There is something wonderfully nostalgic about these colors. They remind me of vintage Halloween decorations, candy wrappers, and those slightly kitschy seasonal graphics that somehow become irresistible every October. If black-and-purple feels too expected, this orange combination is a refreshing change of pace.
Cozy Pumpkin And Ghost Nails For A Soft Halloween Look
Not every Halloween manicure needs long, dramatic claws. This shorter design proves that halloween nail art short nails can be just as expressive, especially when the artwork is concentrated into small, clearly defined motifs. The manicure combines warm caramel brown, creamy white, translucent nude, and touches of red and black. Tiny pumpkins, ghosts, bats, delicate autumn branches, and plaid-inspired details create a cozy seasonal feeling that is much softer than a traditional horror manicure.
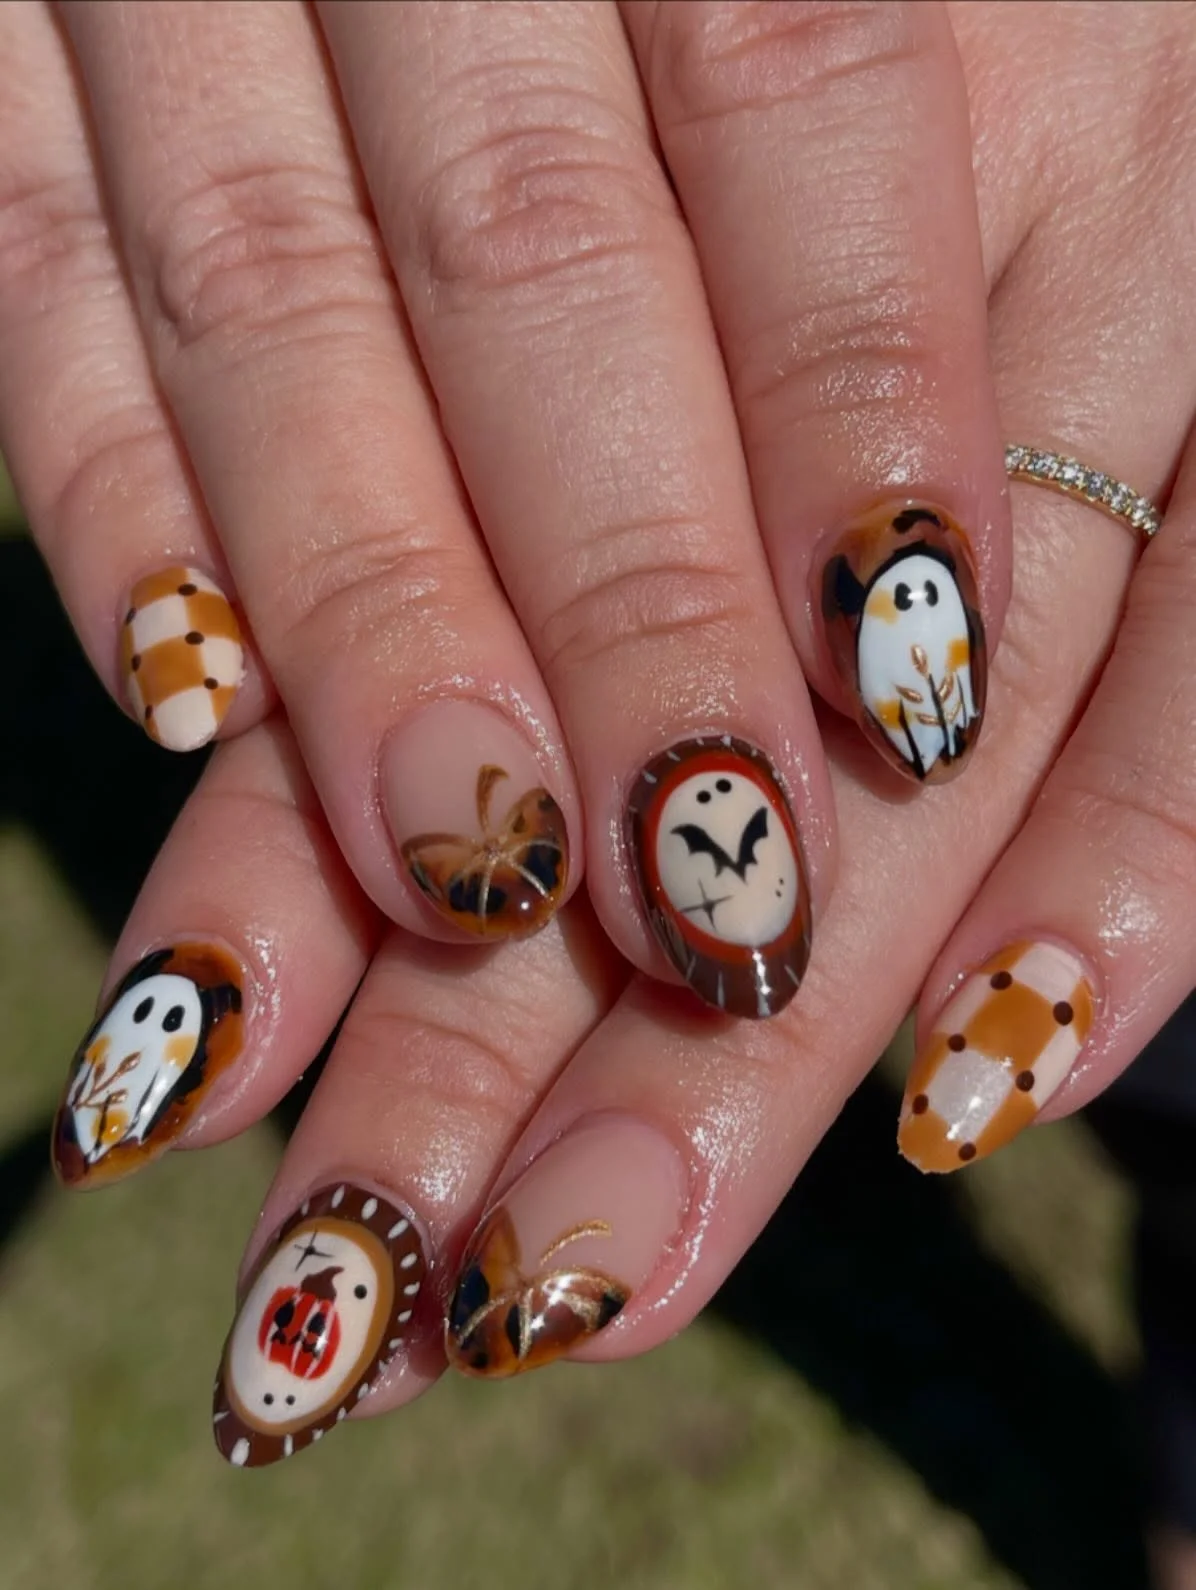
I would choose a sheer nude or blush base, a warm caramel brown, creamy ivory, muted orange, and a small amount of black and red. These shades work especially well together because none of them feels aggressively bright. A fine brush is enough for the little branches and bat silhouettes, while a dotting tool can create the eyes and tiny decorative points. For the plaid-style nails, thin intersecting lines are all you need.
This is also the direction I would recommend for anyone specifically searching for halloween nail art simple or halloween nail art cute. The shorter length keeps the manicure practical, while the individual motifs make it unmistakably seasonal. I would paint the base first, add the larger cream shapes, and finish with the smallest black details only after everything has dried sufficiently. A glossy top coat pulls the whole design together.
I can see myself wearing this manicure with an oversized knit, straight-leg denim, and ankle boots while running around for coffee on a chilly October morning. It feels festive without demanding attention from every outfit. And sometimes that is exactly what I want – a tiny Halloween secret sitting at the end of each finger.
Spooky Floral Skull Almond Nails
I love the unexpected combination of deep navy, bright blue, warm orange, red, and creamy white in this dramatic almond manicure. The long, softly pointed shape gives the design an elegant silhouette, while the hand-painted floral details keep it from feeling overly dark. One accent nail features a colorful flower composition, while another brings in a charming skull surrounded by petals and curved botanical lines. The remaining nails are finished in glossy midnight blue, creating just enough negative visual space to let the artwork stand out. For me, this is one of those halloween nail art designs that feels artistic rather than predictable.
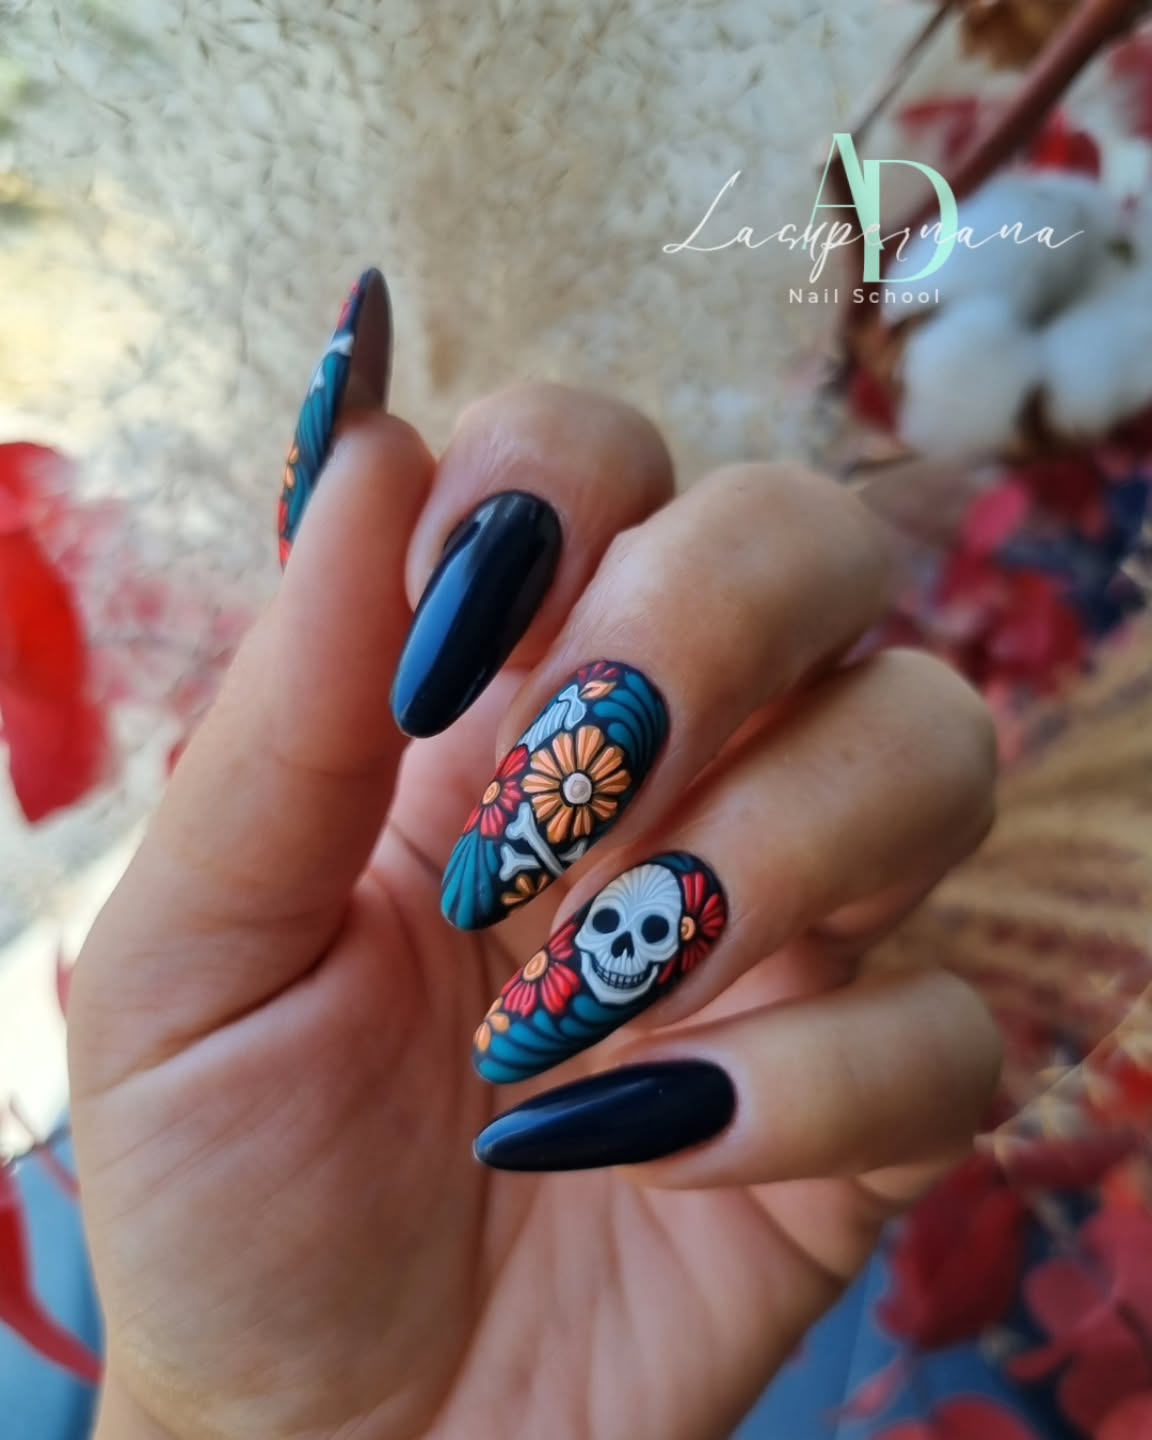
To recreate the palette, I would start with a highly pigmented navy gel polish such as OPI GelColor in a deep blue shade, then add a vivid turquoise, pumpkin orange, muted red, white, and black for the miniature artwork. A fine liner brush is essential for the thin botanical outlines, while a small detail brush makes the flowers and skull easier to control. I would finish everything with a glossy top coat so the dark base looks almost glassy and the illustrated elements have the same polished surface.
At home, I would shape the nails into a balanced almond first, because the artwork looks especially graceful when the sides taper evenly toward the tip. After applying the navy base to the solid nails, I’d sketch the floral elements lightly before filling them with color. The skull should remain crisp and relatively simple – tiny black eye sockets and a few delicate lines are enough to make the expression recognizable. If detailed nail painting is not your strongest skill, this is also a great place to use Halloween nail decals and add hand-painted accents around them.
This is the kind of manicure I would choose for a Halloween party, a fall dinner, or even a weekend when I simply want my nails to become the accessory. The deep blue makes it less expected than the usual black-and-orange combination, while the flowers soften the skull motif. If you already love halloween nail art almond styles, this version gives the classic shape a more colorful, almost storybook personality.
Ghosts And Spiderwebs On Soft Pink
For a softer take on Halloween, I’d pair a sheer blush-pink base with tiny ghosts, spiderwebs, black accents, and miniature orange details. The elongated almond shape keeps the manicure feminine, while the artwork creates a playful contrast against the delicate nude-pink background. Several nails feature little white ghost figures, while others use black-and-white floral or web-inspired compositions. The result feels festive without covering every inch of the nail in dark pigment, which is exactly why I think it works so well for halloween nail art cute.
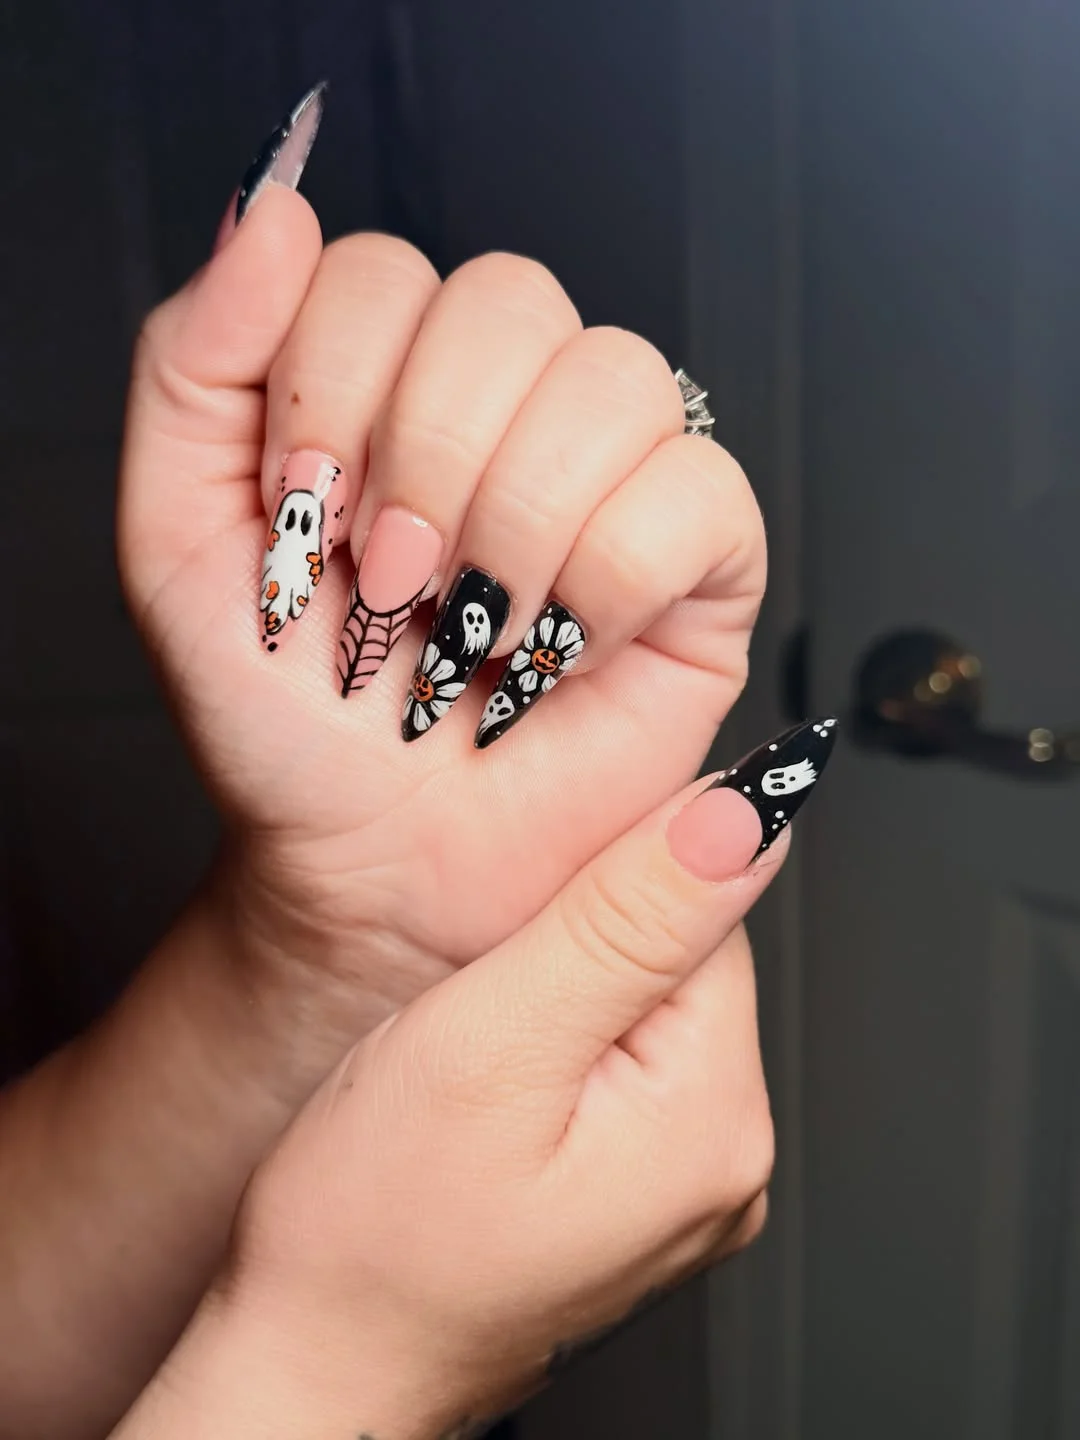
I would use a translucent pink or milky nude gel as the foundation, followed by white, black, pumpkin orange, and a tiny amount of muted gray. The ghost shapes need a small detail brush, but the spiderwebs are easiest with an ultra-fine liner. A glossy top coat works beautifully here because it keeps the pink base fresh and allows the tiny illustrations to remain visually crisp. For a more delicate finish, I would avoid adding rhinestones or heavy embellishment – the line work is already doing the work.
The easiest approach is to paint the pink base and cure it before adding the illustrations one nail at a time. I’d outline each ghost in white, cure, and then add the little black eyes and mouth. For the webs, I’d draw a few thin radiating lines first and connect them with curved lines rather than trying to create the entire web in one movement. This is also a clever option if you are searching for halloween nail art easy enough to adapt at home.
I particularly like this direction for anyone who wants Halloween nails but does not want the manicure to dominate an outfit. The soft pink keeps everything wearable with sweaters, denim, dresses, or even office clothes, while the ghosts add that unmistakable October mood. It also shows why halloween nail art almond shape designs can be so versatile – the pointed silhouette gives playful artwork a polished finish.
Classic Orange Halloween Storybook Nails
Nothing says Halloween quite like pumpkin orange, and this manicure completely embraces it. I see several familiar symbols brought together across the nails – a black haunted house, spiderwebs, spiders, a wrapped mummy, a bubbling black cauldron, a bare tree, and a pumpkin wearing a witch hat. Instead of repeating one motif, the manicure creates a miniature Halloween story across the hands. For anyone collecting halloween nail art ideas, this is the maximalist approach I would save for a festive October weekend.
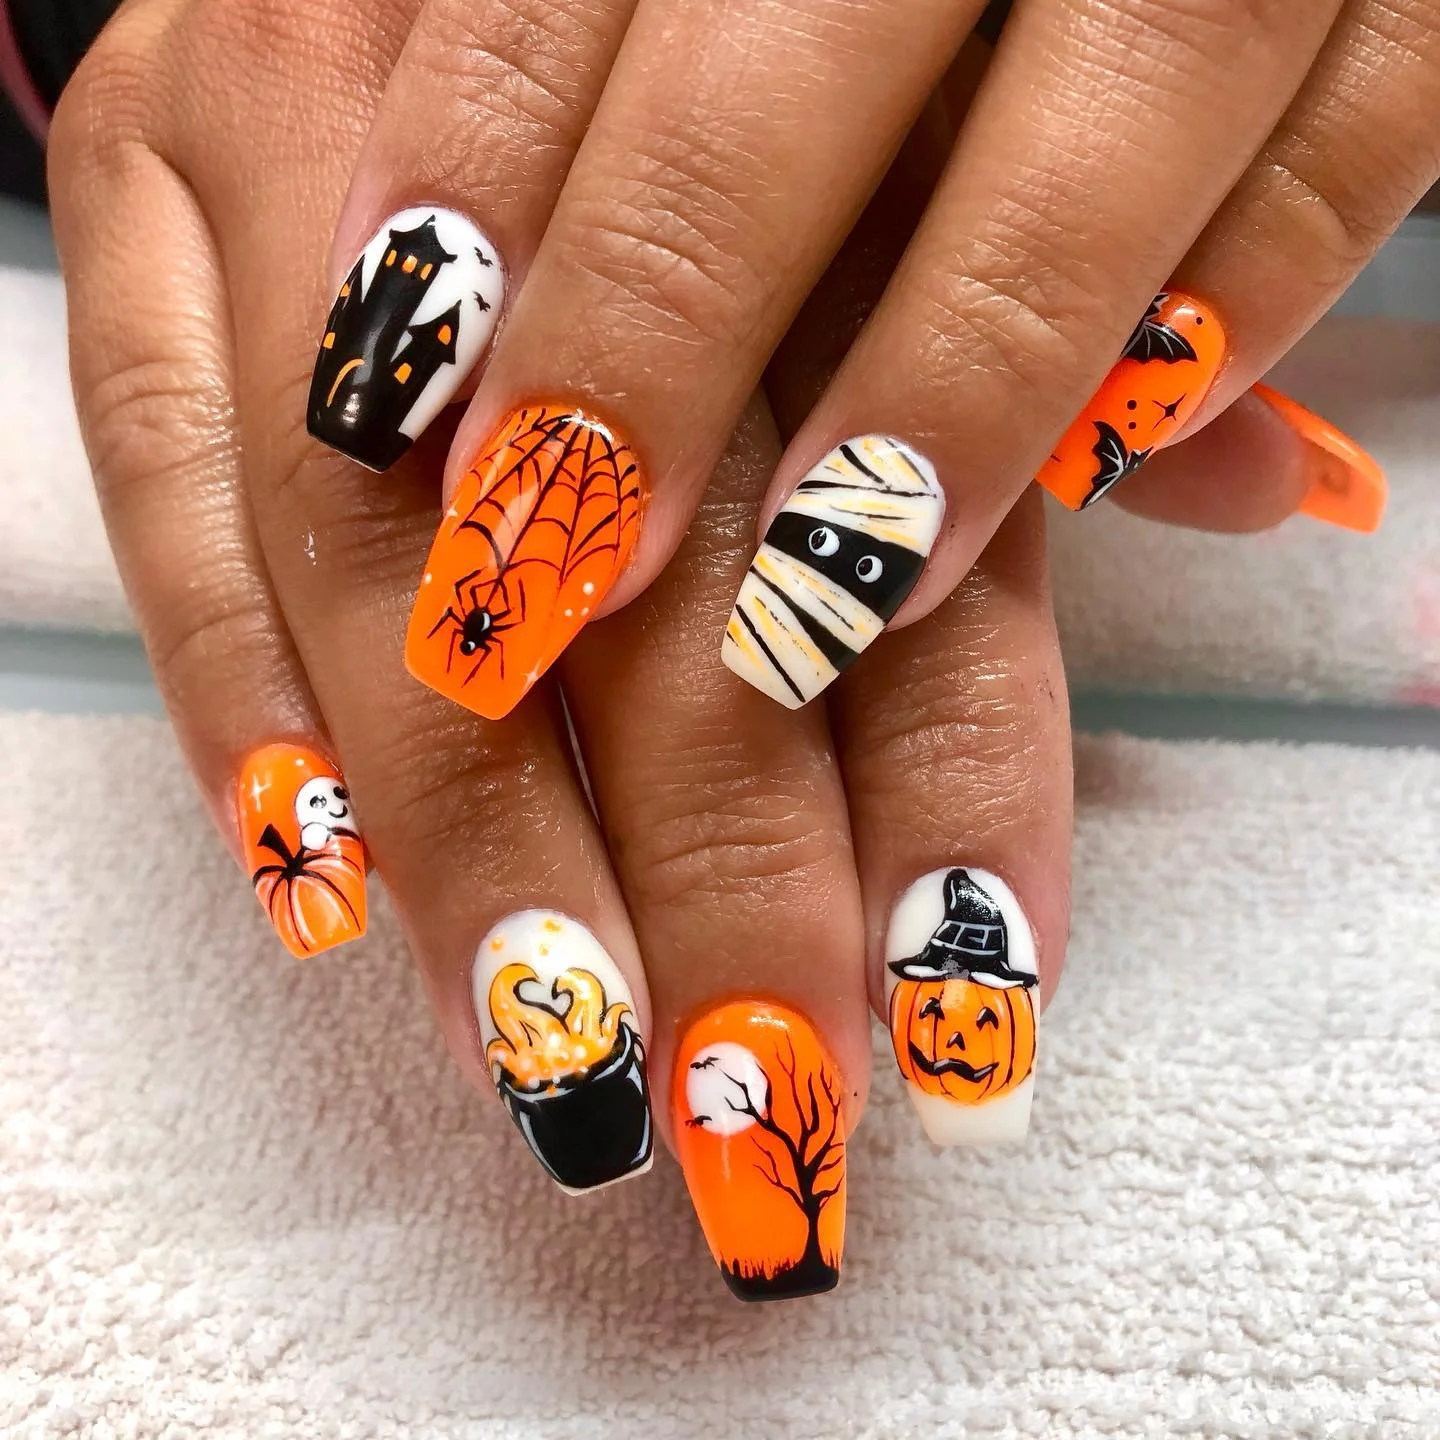
The color palette is wonderfully straightforward: saturated orange, glossy black, warm white, and small touches of yellow and brown. I would use a strong orange gel polish as the main color, then add black gel paint for the outlines and silhouettes. White is useful for the mummy and ghostly details, while yellow creates the glowing windows and small highlights. A fine liner, dotting tool, and small flat detail brush would be enough for most of the work, so I would not overcomplicate the kit.
I’d begin with the orange and white base colors, curing each layer before starting the illustrations. The haunted house can be painted as a simple black silhouette with tiny yellow windows, while the spiderweb needs only a few precise curved lines. For the mummy, irregular horizontal stripes actually work better than perfectly straight ones because they create a more natural wrapped effect. The pumpkin should receive its facial details last, followed by a glossy top coat to bring the whole manicure together.
This style reminds me why Halloween is such a fun beauty holiday – there really are no rules about being too playful. I would choose it for a costume party or Halloween event rather than an everyday manicure, especially because every nail has its own little character. If you enjoy halloween nail arts with lots of storytelling, this is the sort of design that keeps giving you something new to notice.
Black And White Pumpkin Floral Mix
Sometimes Halloween looks better when the color palette is restrained, and this manicure makes a strong case for black, white, and small pops of orange. The solid glossy black nails create a sleek foundation, while the decorated nails combine tiny jack-o’-lanterns, white daisy-like flowers, and geometric blocks of color. The contrast is crisp and graphic, but the rounded almond shape prevents it from becoming harsh. I’d call this a sophisticated interpretation of halloween nail art black and white with just enough orange to make the holiday connection obvious.
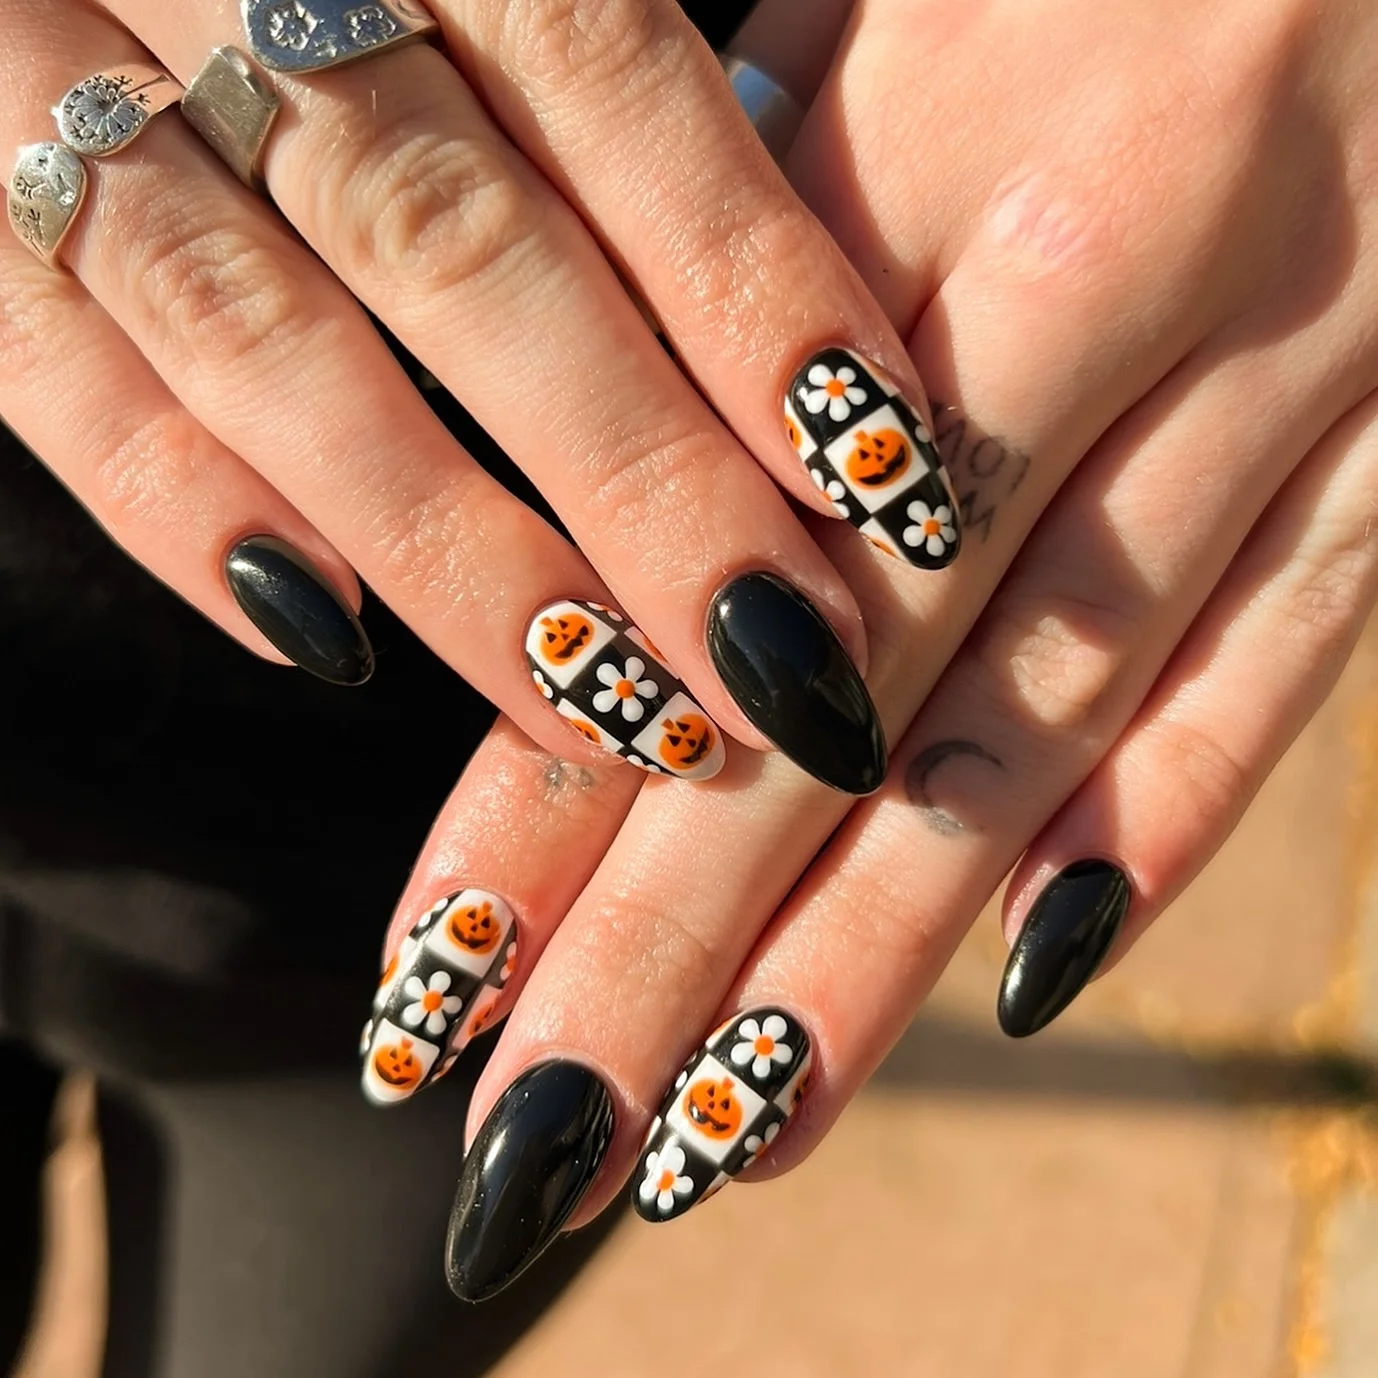
For this manicure, I would reach for an opaque black gel, a clean white, and a vivid orange that leans slightly toward pumpkin rather than neon. A small dotting tool makes the flowers much easier, while a liner brush helps define the tiny pumpkin faces. The solid black nails should have an especially smooth finish because they become part of the design rather than simply acting as filler. I would also keep the orange details consistent across every decorated nail so the manicure feels cohesive.
The design can be simplified considerably for a home manicure. I’d paint the black nails first, then create the white panels on the accent nails. Once those are cured, I’d add tiny orange pumpkins and simple five-petal flowers. There is no need to make every flower identical – slight differences actually give the manicure a more handmade quality. If precision is difficult, pumpkin decals can replace the smallest illustrations without changing the overall idea.
I like this version because it can transition surprisingly well from Halloween celebrations into the rest of fall. The black and white base feels sophisticated, while the little pumpkins provide the seasonal twist. If you are looking for halloween nail art designs easy enough to customize, I would borrow the color scheme even if I changed the motifs completely.
Mini Ghosts And Autumn Florals On Short Nails
Short nails can absolutely have a Halloween moment, and I think this delicate manicure proves it. The natural nude base keeps the nails looking clean and understated, while tiny white ghosts, orange flowers, green leaves, brown centers, and fine black spiderwebs create a charming autumn composition. Nothing feels oversized, which is important when working with a shorter nail plate. For me, this is one of the sweetest examples of halloween nail art short nails because the design celebrates the season without sacrificing a neat everyday shape.
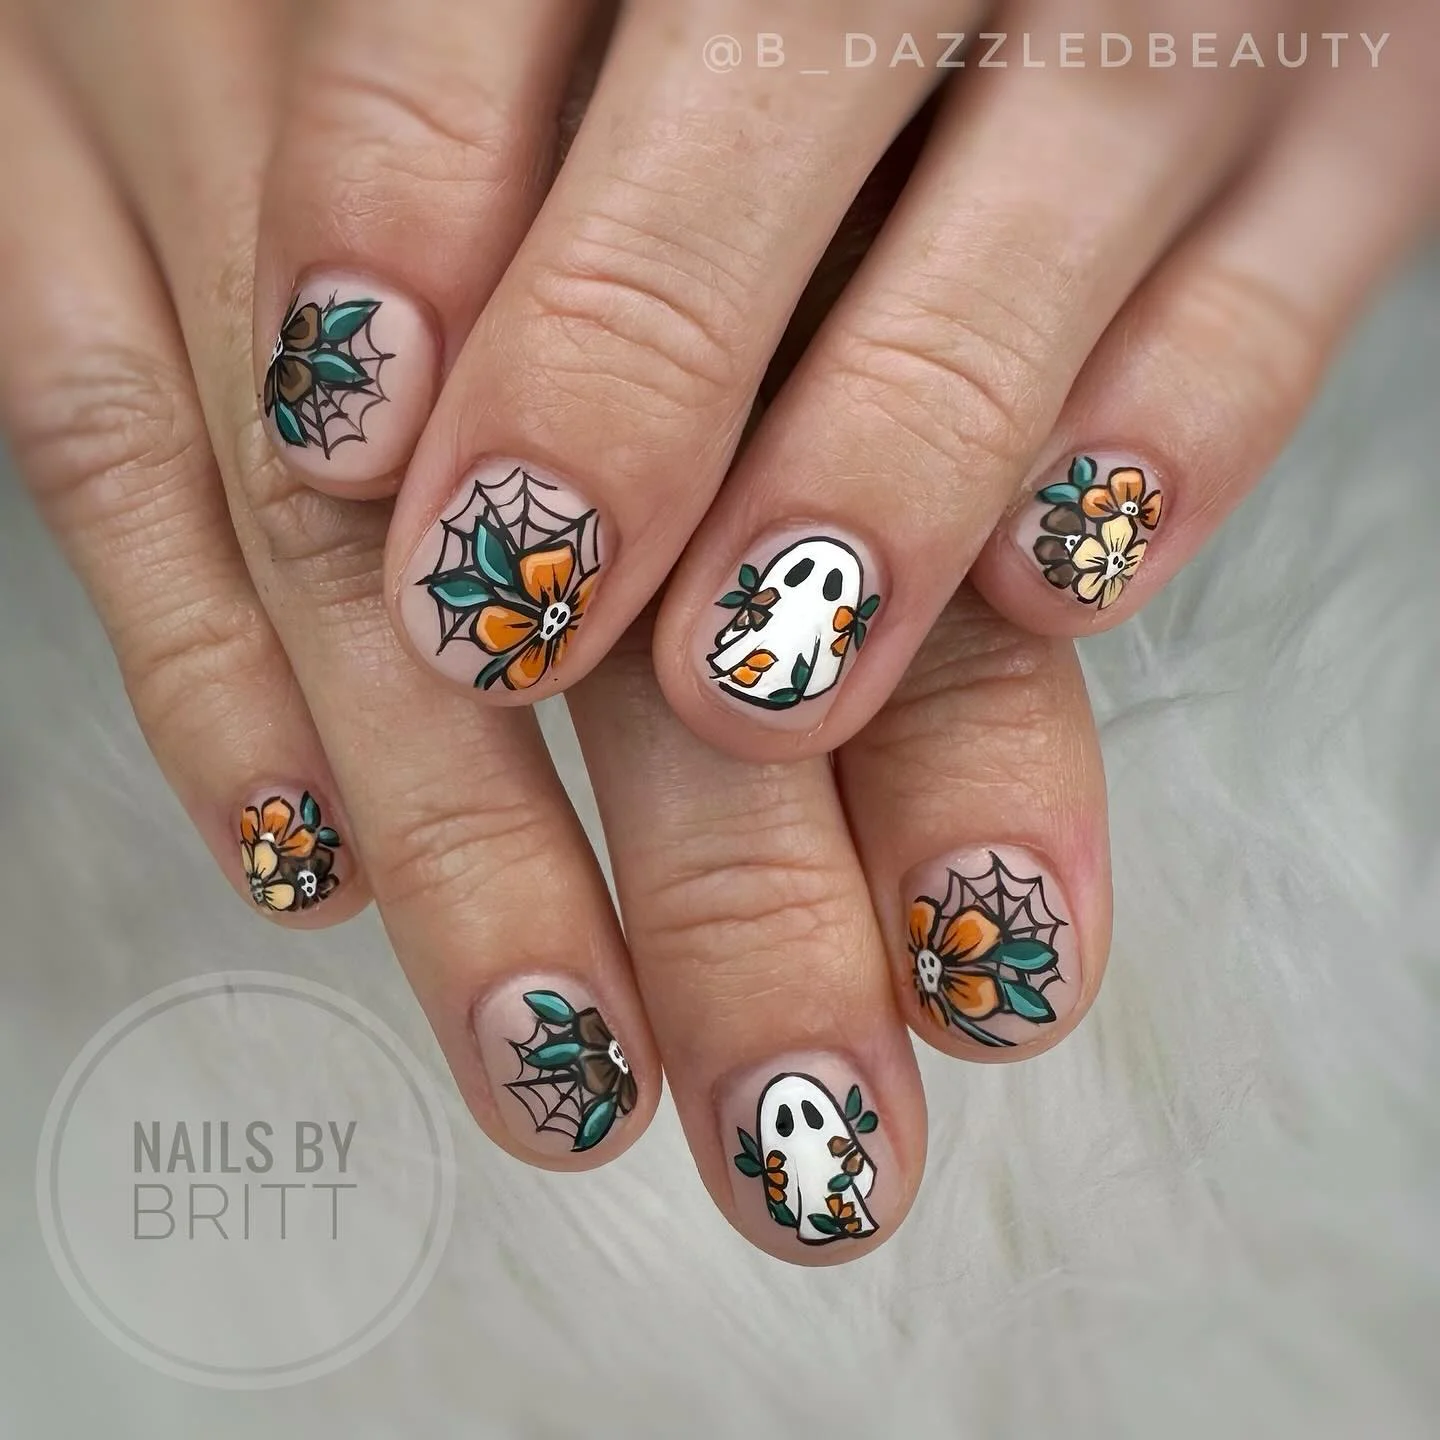
I would keep the base close to the natural nail with a sheer beige-pink or translucent nude gel. The artwork needs white, orange, black, muted green, and a soft brown, with the green used sparingly to prevent the manicure from drifting into a summer floral look. A very fine liner is useful for the spiderwebs and ghost outlines, while a tiny dotting tool makes the floral centers much easier. I would choose a glossy finish because it gives the miniature artwork a fresh, polished appearance.
For a home version, I’d start with the nude base and let it become the visual background for everything else. The flowers can be created from a few small petals rather than complicated brushwork, and the ghost shapes only need a rounded white body plus two tiny black eyes. On the spiderweb nails, I’d keep the lines extremely thin and position the web toward one side so it does not overwhelm the small nail. This is exactly where halloween nail art simple can be more effective than a complicated composition.
Personally, I would wear this style when I wanted something festive enough for October but subtle enough for everyday life. It would look lovely with a chunky cardigan, a neutral coat, or even a simple black dress, and the muted botanical colors give it a distinctly autumnal feeling. If you have been searching for halloween nail art short, halloween nail art cute, or an understated halloween nail art 2026 idea, this direction is an easy one to adapt without needing long extensions or elaborate sculpting.
Glamorous Ghosts And Crimson Spiderwebs
I love the dramatic contrast in this manicure because it turns classic Halloween symbols into something much more polished. The nails are long and sharply tapered, with a soft blush-pink base used on several designs, while glossy black and vivid red create the stronger accents. A white ghost with an exaggerated open mouth becomes the main statement, while neighboring nails feature red spiderwebs with sparkling centers, stitched red-and-black details, tiny black stars, dots, and crescent moons. It has that slightly eerie, slightly playful mood I always want from halloween nail art designs without making every nail look identical.
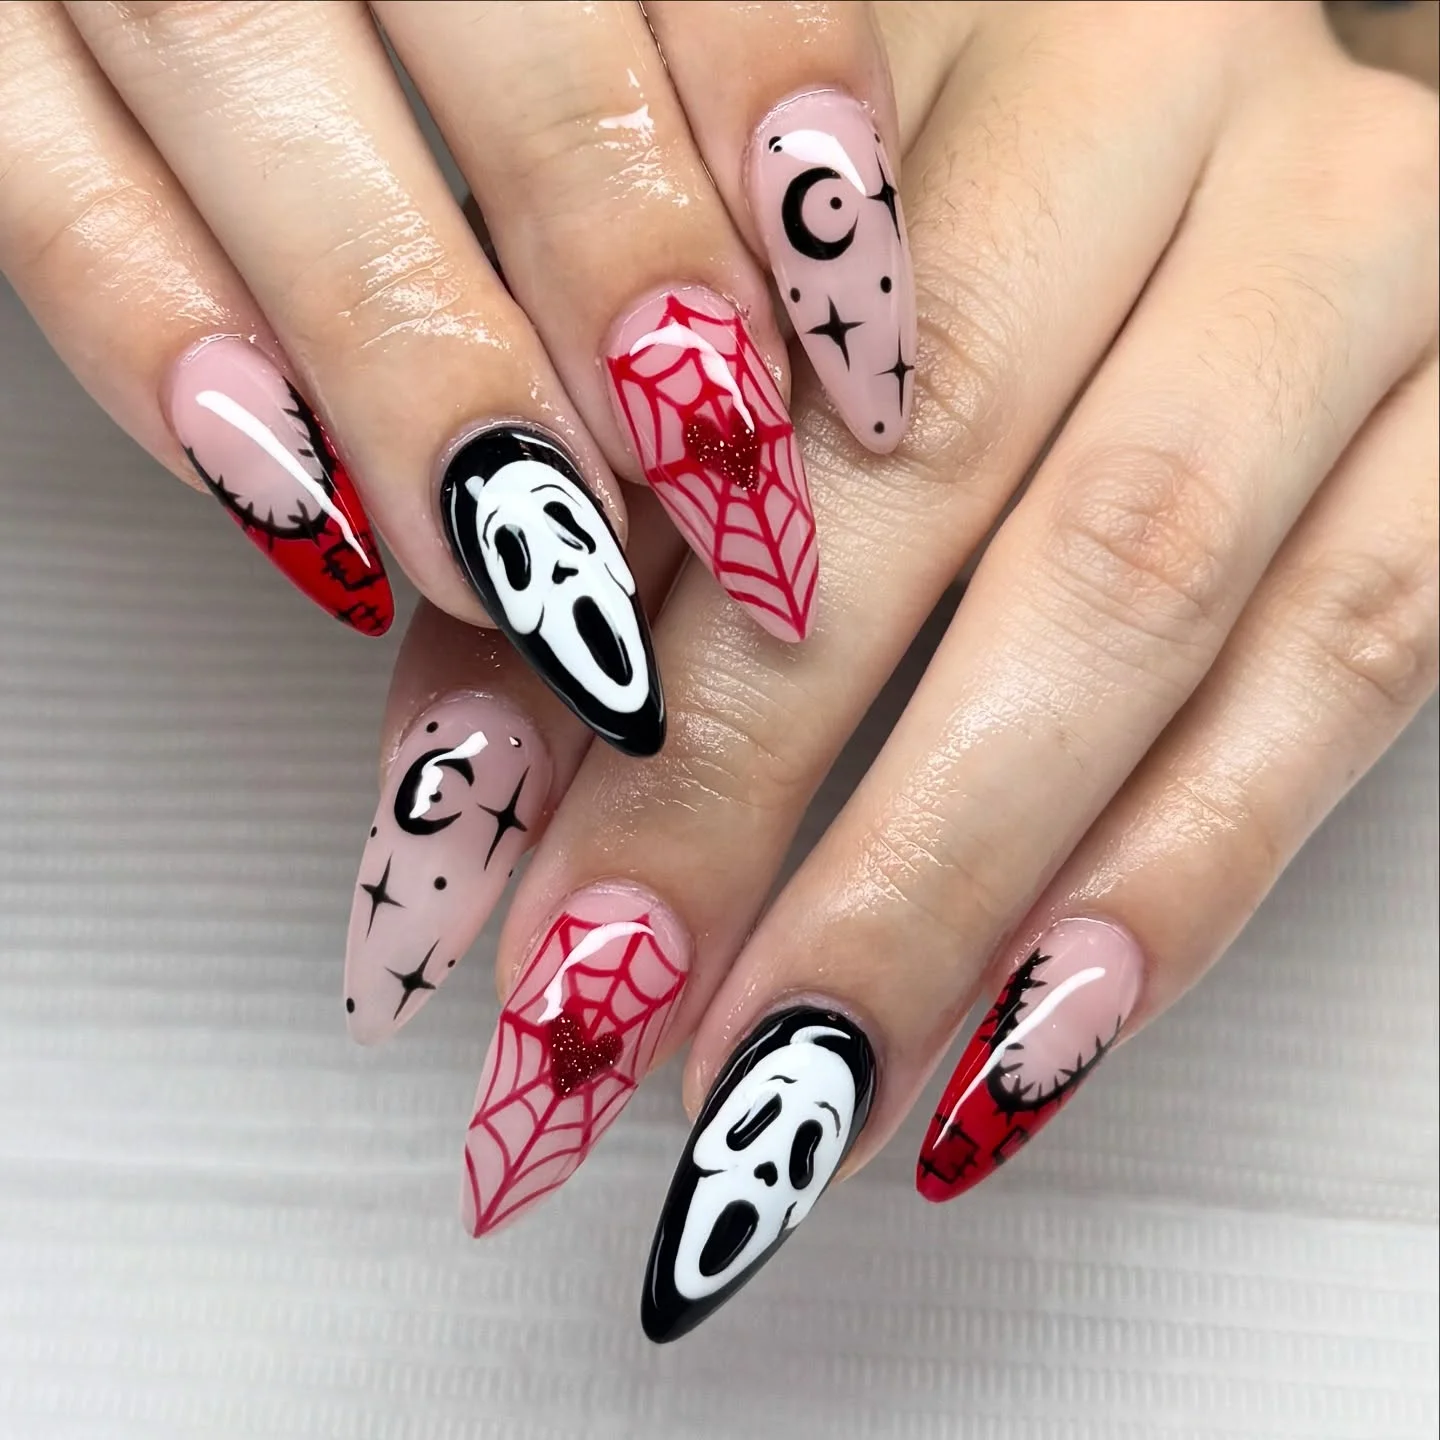
For a similar palette, I would reach for a sheer pink or nude-pink gel base, an intense black, a true white, and a saturated blood-red. A fine liner brush is essential for the spiderwebs and stitched borders, while a small detail brush helps create the ghost’s facial expression. The tiny red glitter in the spiderweb centers adds a lovely dimensional touch, so I would use a fine glitter gel or a few micro-glitter particles rather than large rhinestones.
I would begin by shaping the nails into a clean almond or tapered almond silhouette and applying the pink base to the appropriate nails. Then I would build the black-and-white ghost slowly, starting with its white body before adding the black eyes and mouth. For the web nails, I would draw the central lines first and connect them with curved sections, finishing with the red glitter detail. If the full manicure feels too ambitious, I would keep the ghost and one web as statement nails and simplify the remaining tips.
This is one of those halloween nail art ideas I would save for a Halloween party, a night out, or simply the last week of October when I want the manicure to become part of the outfit. The blush base keeps the look surprisingly feminine, while the red and black give it enough attitude. It feels theatrical, but not messy – exactly the balance I look for in seasonal nail art.
Cozy Pumpkin Ghost Nails With Tiny Bat Accents
Here, Halloween feels softer and much more autumnal. The manicure combines warm orange, creamy white, caramel brown, and nude tones on elongated almond nails. Tiny black bats fly across one orange accent, while another nail features an adorable white ghost surrounded by small orange flowers or pumpkin-inspired details. A caramel-brown nail is scattered with neat white dots, and the striped orange nail finishes the look with a tiny black-and-white floral accent. The overall effect is cheerful, cozy, and distinctly seasonal, making it a lovely choice for halloween nail art cute styles.
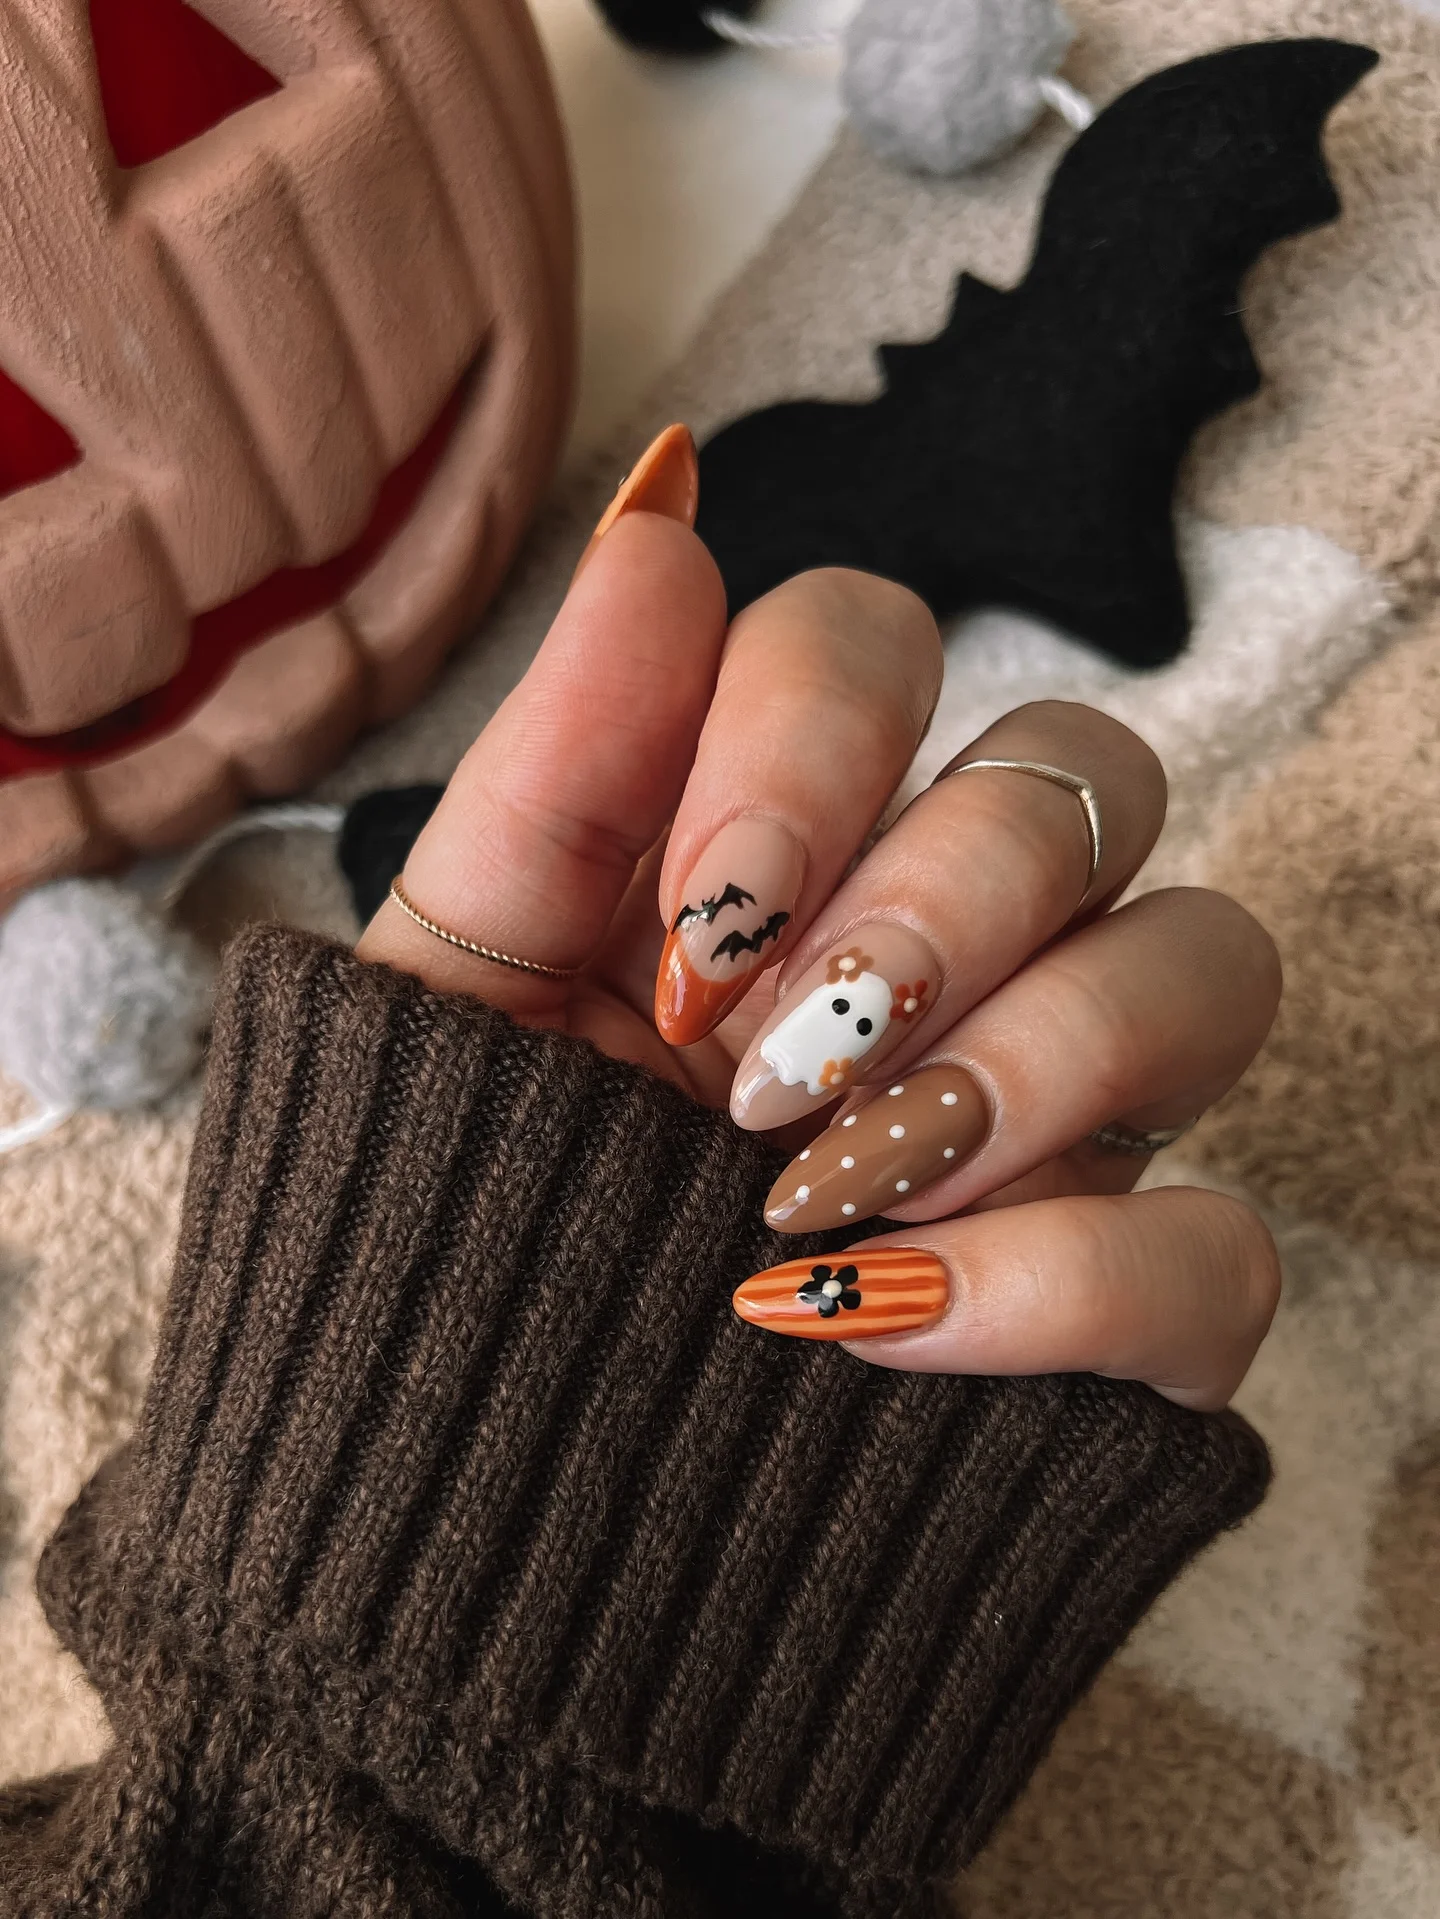
I would build this palette around a muted pumpkin orange, creamy ivory, warm caramel, soft nude, and black for the smallest details. A glossy finish works especially well because it makes the orange appear richer and keeps the little ghost looking crisp. For the dot pattern, a dotting tool is convenient, while a very fine brush is better for the bats and the tiny flower-like accents around the ghost.
To make this manicure at home, I would first create the almond shape and apply the neutral bases. The striped orange nail can be done with several thin vertical lines, while the caramel nail only needs evenly spaced white dots. For the ghost, I would paint a small white silhouette and add two black eyes, then surround it with tiny orange and white accents. The bat is much easier than it looks – a few connected black shapes can suggest wings without requiring a complicated drawing.
I especially like how naturally this design works with fall clothing. Pull on a chunky brown sweater, add gold jewelry, and the manicure suddenly feels like part of the entire October palette. It is playful enough for Halloween but restrained enough for everyday wear, which is why I would choose it when I want halloween nail art simple without giving up personality.
Vintage Halloween Almond Nails In Chocolate Brown
This manicure takes Halloween in a beautifully vintage direction. The long almond nails are built around chocolate brown, warm caramel, creamy ivory, and glossy black, with each nail carrying a slightly different motif. One tip is a deep brown tortoiseshell-like blend, while others feature delicate framed medallions, a tiny crescent moon, a stylized Halloween character, and a neat caramel-and-cream checkerboard pattern. The fine borders and ornamental details make the manicure feel almost like a tiny collection of antique Halloween illustrations, and the brown palette gives it a sophisticated edge.
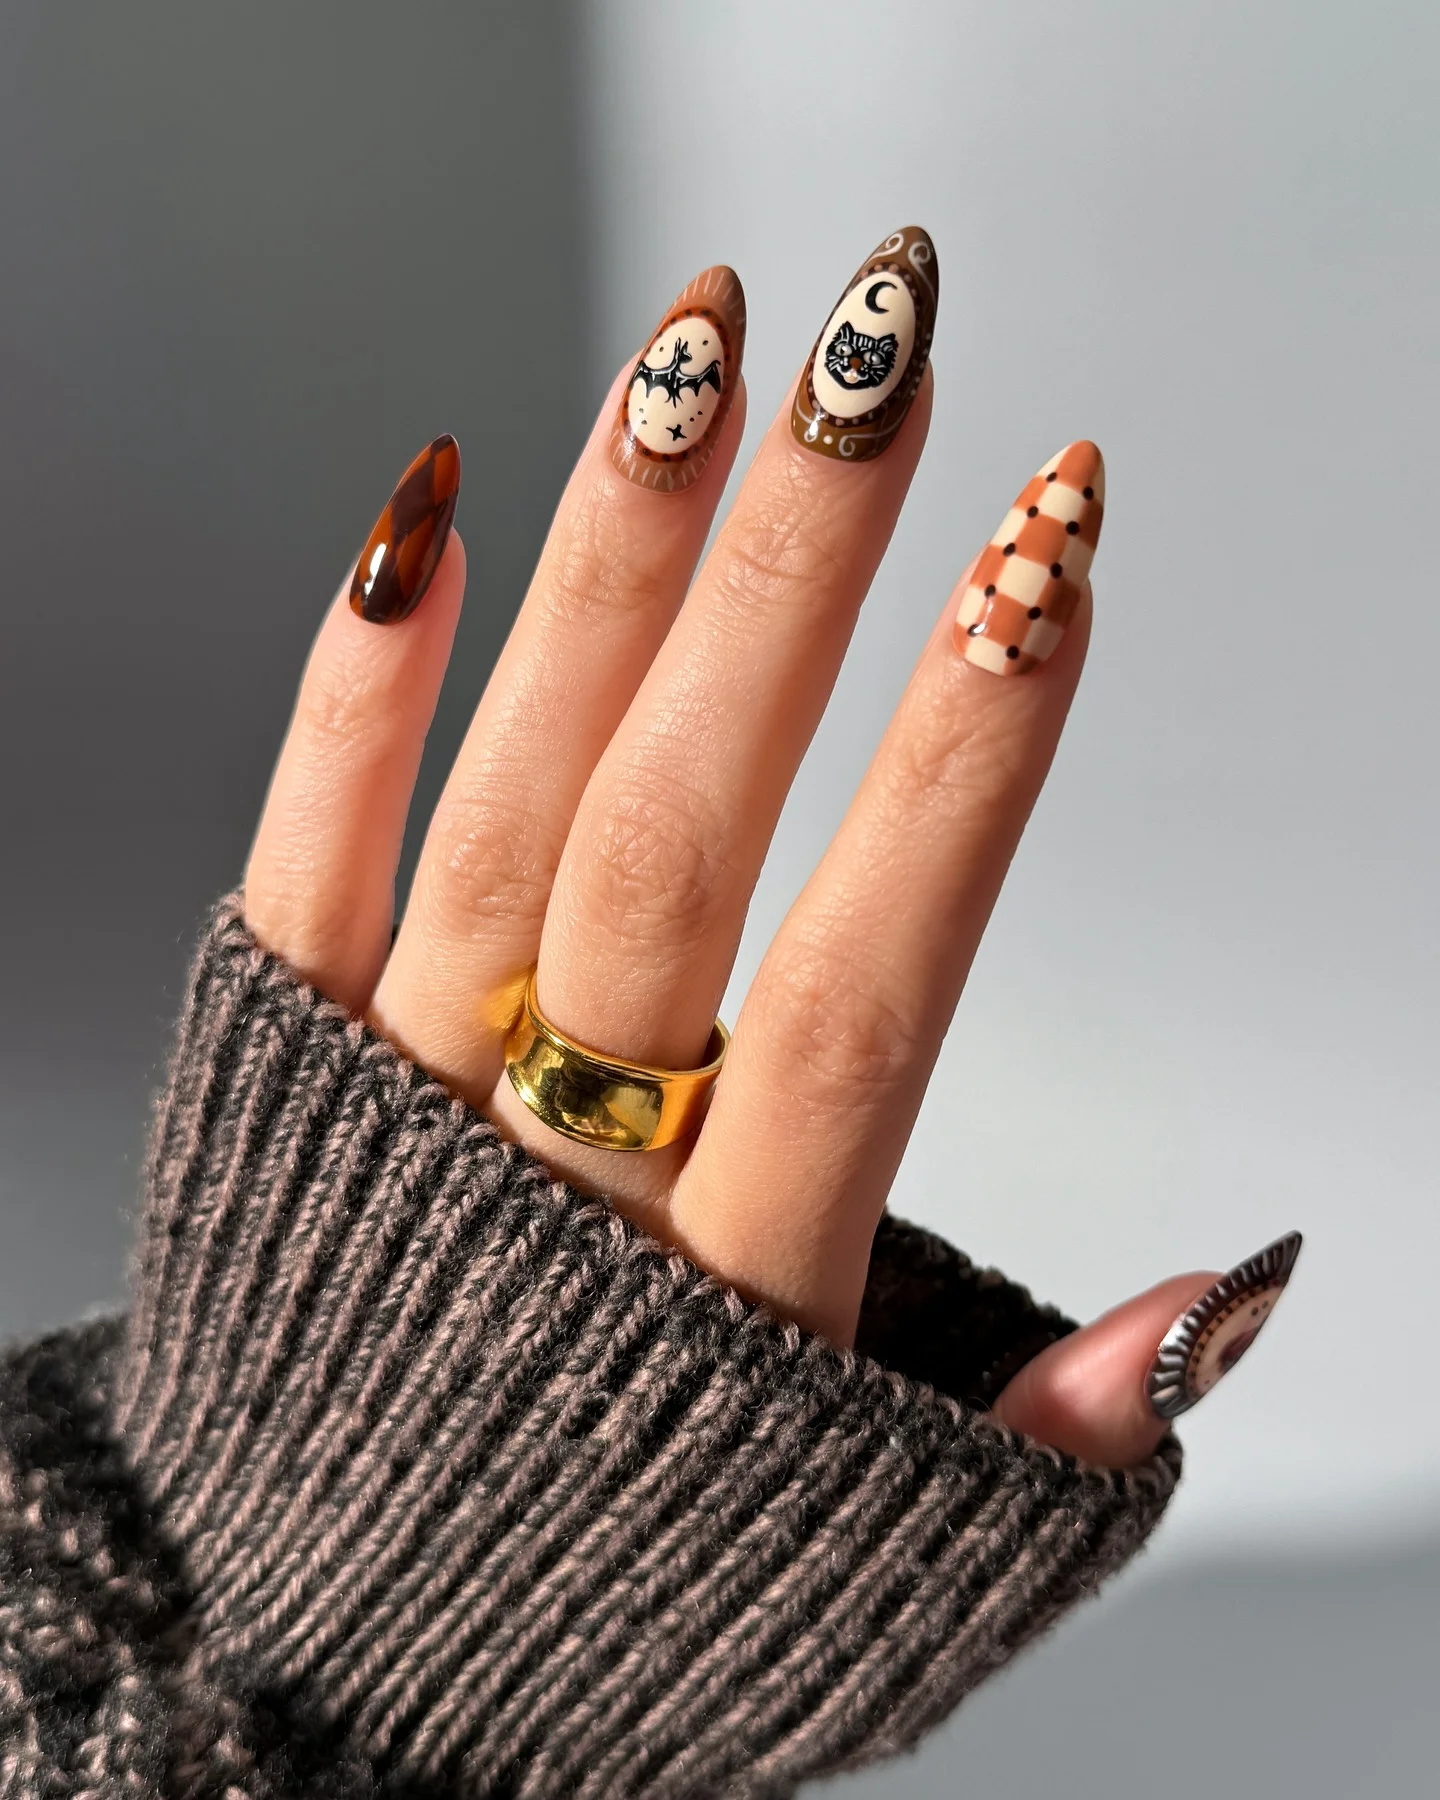
For the base, I would choose several related shades rather than one flat brown – chocolate, cinnamon, caramel, cream, and black. A warm ivory is particularly useful for the small central illustrations because it creates a clean contrast against the darker borders. I would also keep a very fine liner brush nearby for the ornamental lines and tiny symbols. A high-gloss top coat is the finishing touch here because it makes the warm colors look almost lacquered.
I would treat each nail almost like a miniature frame. After applying the base colors, I would create the cream centers on the statement nails and carefully outline them with brown. The moon, floral-style motifs, and character details can then be layered in with a fine brush. For the checkerboard nail, I would use thin caramel and cream sections rather than trying to make every square perfectly identical. Slight variation actually adds to the vintage character.
This is my favorite kind of Halloween manicure when I want something that does not scream “costume.” The chocolate tones make it easy to wear with denim, knitwear, leather, or even a simple neutral coat. If I were searching for halloween nail art almond or halloween nail art almond shape inspiration with a more elevated feel, this would be very high on my list.
Glowing Pumpkin Nails With Amber Crystal Details
Pumpkins, ghosts, bats, and sparkling orange crystals come together in a manicure that feels almost illuminated from within. Several nails have a translucent nude-to-orange gradient, with a faceted amber crystal placed at the center of a black starburst. The darker accent nails carry detailed pumpkin faces, curling green stems, a floating bat, tiny black stars, and a soft glitter background. The combination of orange and charcoal creates a wonderfully classic Halloween palette, but the crystals give it a glamorous finish.
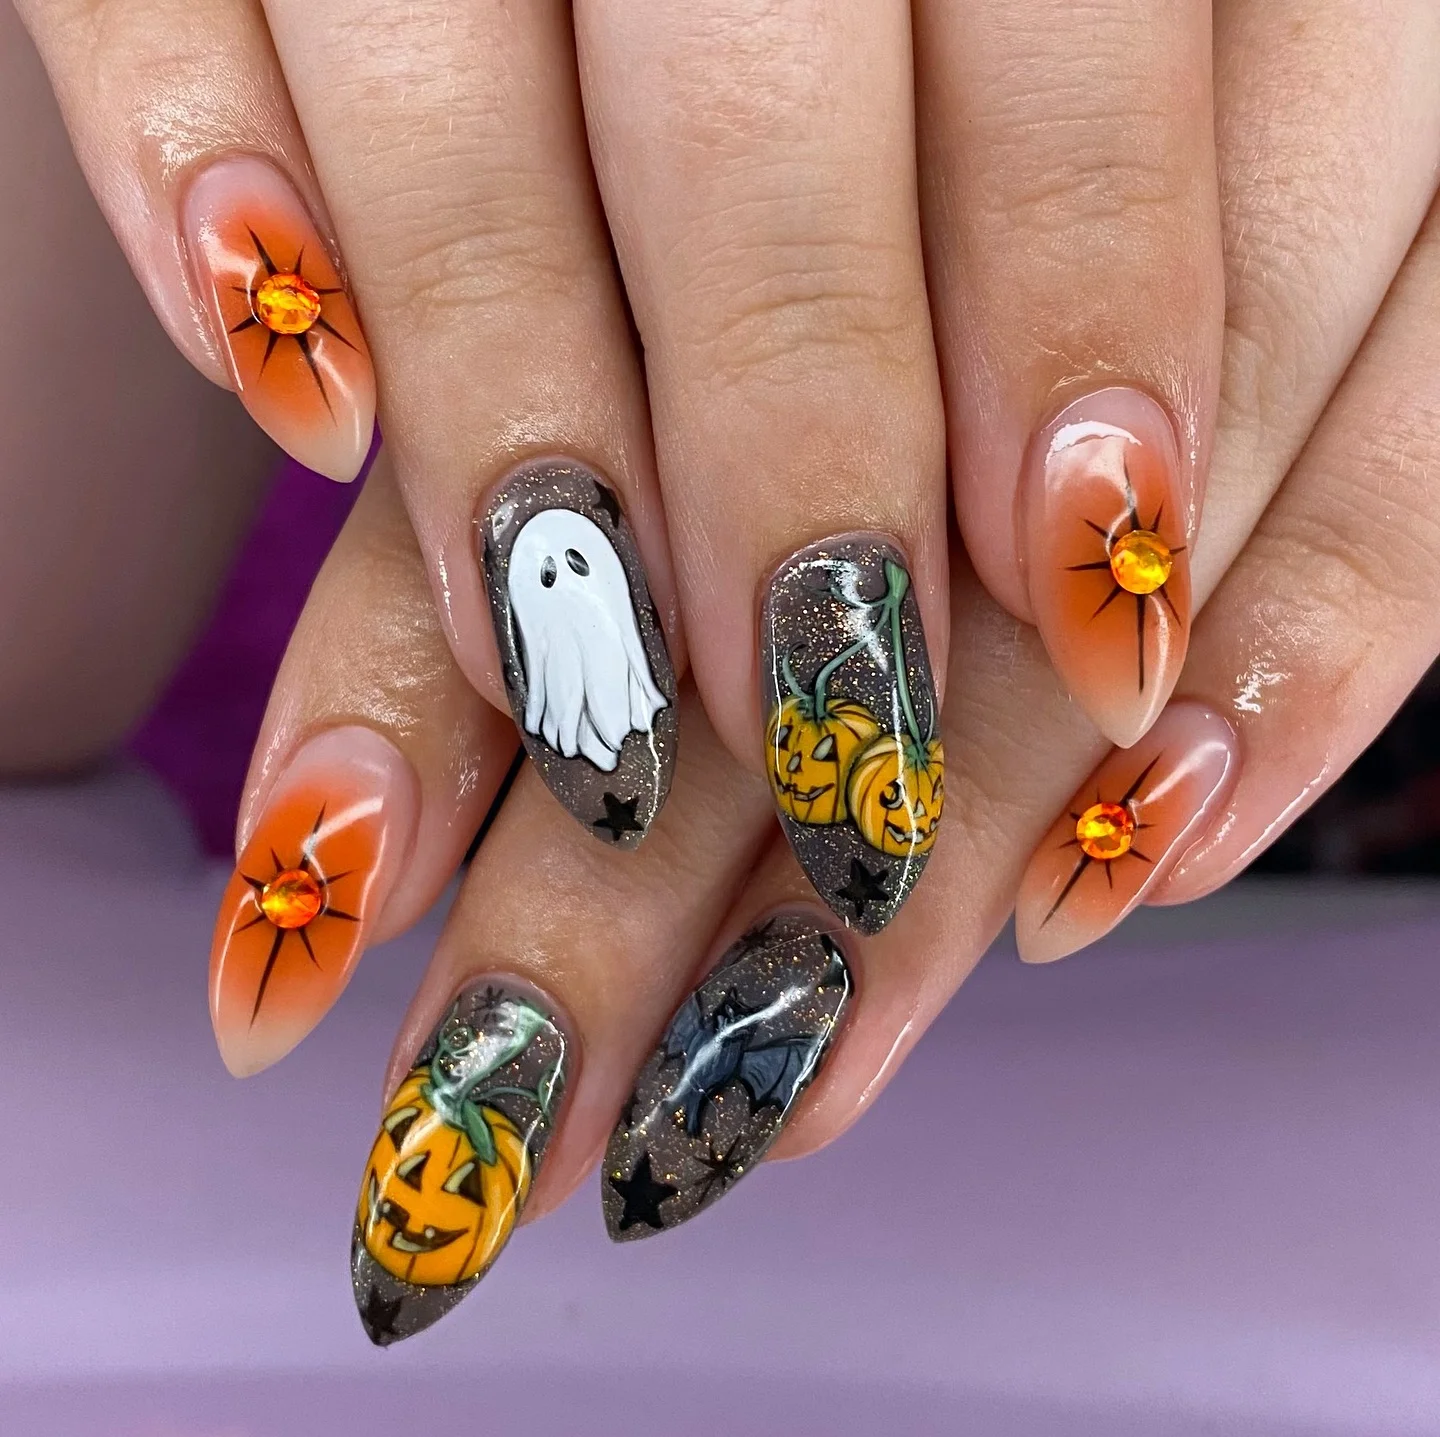
I would use a sheer nude, pumpkin orange, charcoal gray, black, white, and a muted green for the stems. A fine gold or silver micro-glitter can reproduce the subtle sparkle in the darker background, while small amber rhinestones create the glowing centers. I would choose crystals with a warm orange-gold reflection rather than clear stones because they reinforce the pumpkin color and make the manicure feel more cohesive.
I would start with the nude base and blend orange toward the free edge, keeping the center slightly translucent. Once the gradient is cured or dry, I would add the thin black starburst lines and place the amber crystal carefully in the middle. On the accent nails, I would paint the pumpkins in layers – orange first, then darker facial details and green stems. The bat and stars can remain black and relatively simple so the pumpkins stay visually dominant.
I think this style works beautifully for anyone who wants traditional Halloween imagery with a little more sparkle. The crystals catch the light when the hands move, which makes the manicure particularly pretty in evening settings. It is festive without relying entirely on black, and that warm orange glow feels almost tailor-made for late October.
Purple Skull Florals And Midnight Moonlight
For a darker and more unexpected interpretation, I would choose this deep purple-and-black floral manicure. The nails are coated in glossy black and decorated with rich purple flowers, cool blue-gray foliage, tiny white skull centers, crescent moons, little ghosts, stars, and delicate botanical lines. Rather than treating Halloween as a collection of isolated symbols, the design combines everything into one mysterious garden. The purple flowers soften the black background, while the miniature skulls and ghosts keep the manicure unmistakably spooky.
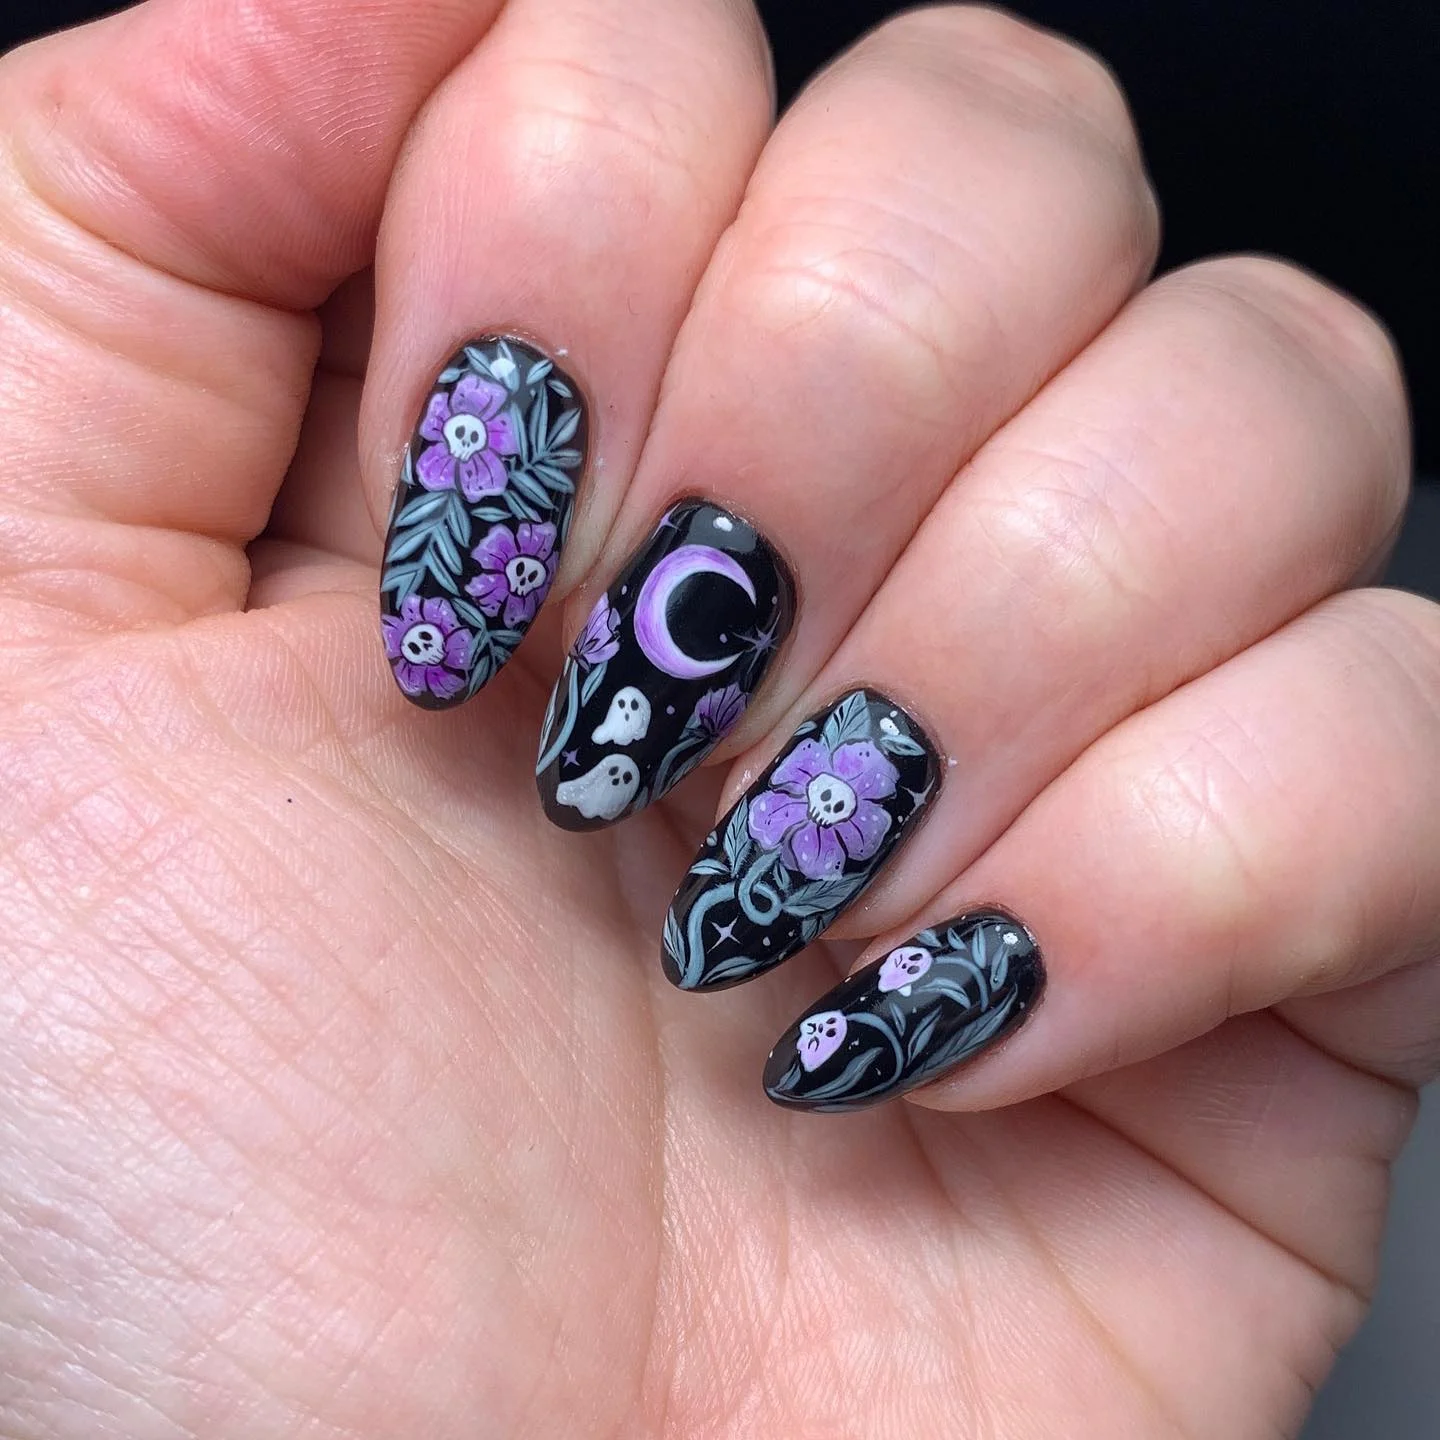
I would reach for a deep black gel polish, a saturated violet, lavender for highlights, cool gray-blue for the leaves, and white for the tiny skulls and ghosts. A small detail brush is the most important tool because the foliage requires thin, controlled strokes. I would also keep a dotting tool available for the skull eyes and miniature stars. A glossy top coat is ideal for this design because the reflective surface makes the purple flowers look richer against the black background.
I would begin with the black base and then sketch the larger foliage in muted gray-blue. The purple flowers can be built from several curved petals, with a tiny white skull placed in the center once the petals are finished. On the moon nail, I would create the crescent first and then add the ghosts and stars around it. The secret is to work in layers and leave enough black negative space so the botanical details do not disappear into one another.
This is the manicure I would choose when classic orange feels a little too predictable. It has a witchy, nocturnal quality that works beautifully with black clothing, silver jewelry, and deep berry makeup. For me, it also shows how halloween nail art 2026 can move beyond pumpkins and bats – a dark floral composition can feel just as festive, but considerably more mysterious.
Vintage Brown Cat And Bat Almond Nails
I’m completely into the vintage autumn mood of this almond manicure. The palette moves through caramel, cinnamon, creamy beige, chocolate brown, and black, creating a cozy Halloween look that feels almost like a piece of retro fabric. Cats, bats, crescent moons, stars, dots, and curved decorative lines are arranged across the nails, while the pointed almond shape gives everything a polished finish. For me, this is one of the more distinctive halloween nail art designs because it skips the usual bright orange overload and leans into a sophisticated fall palette.
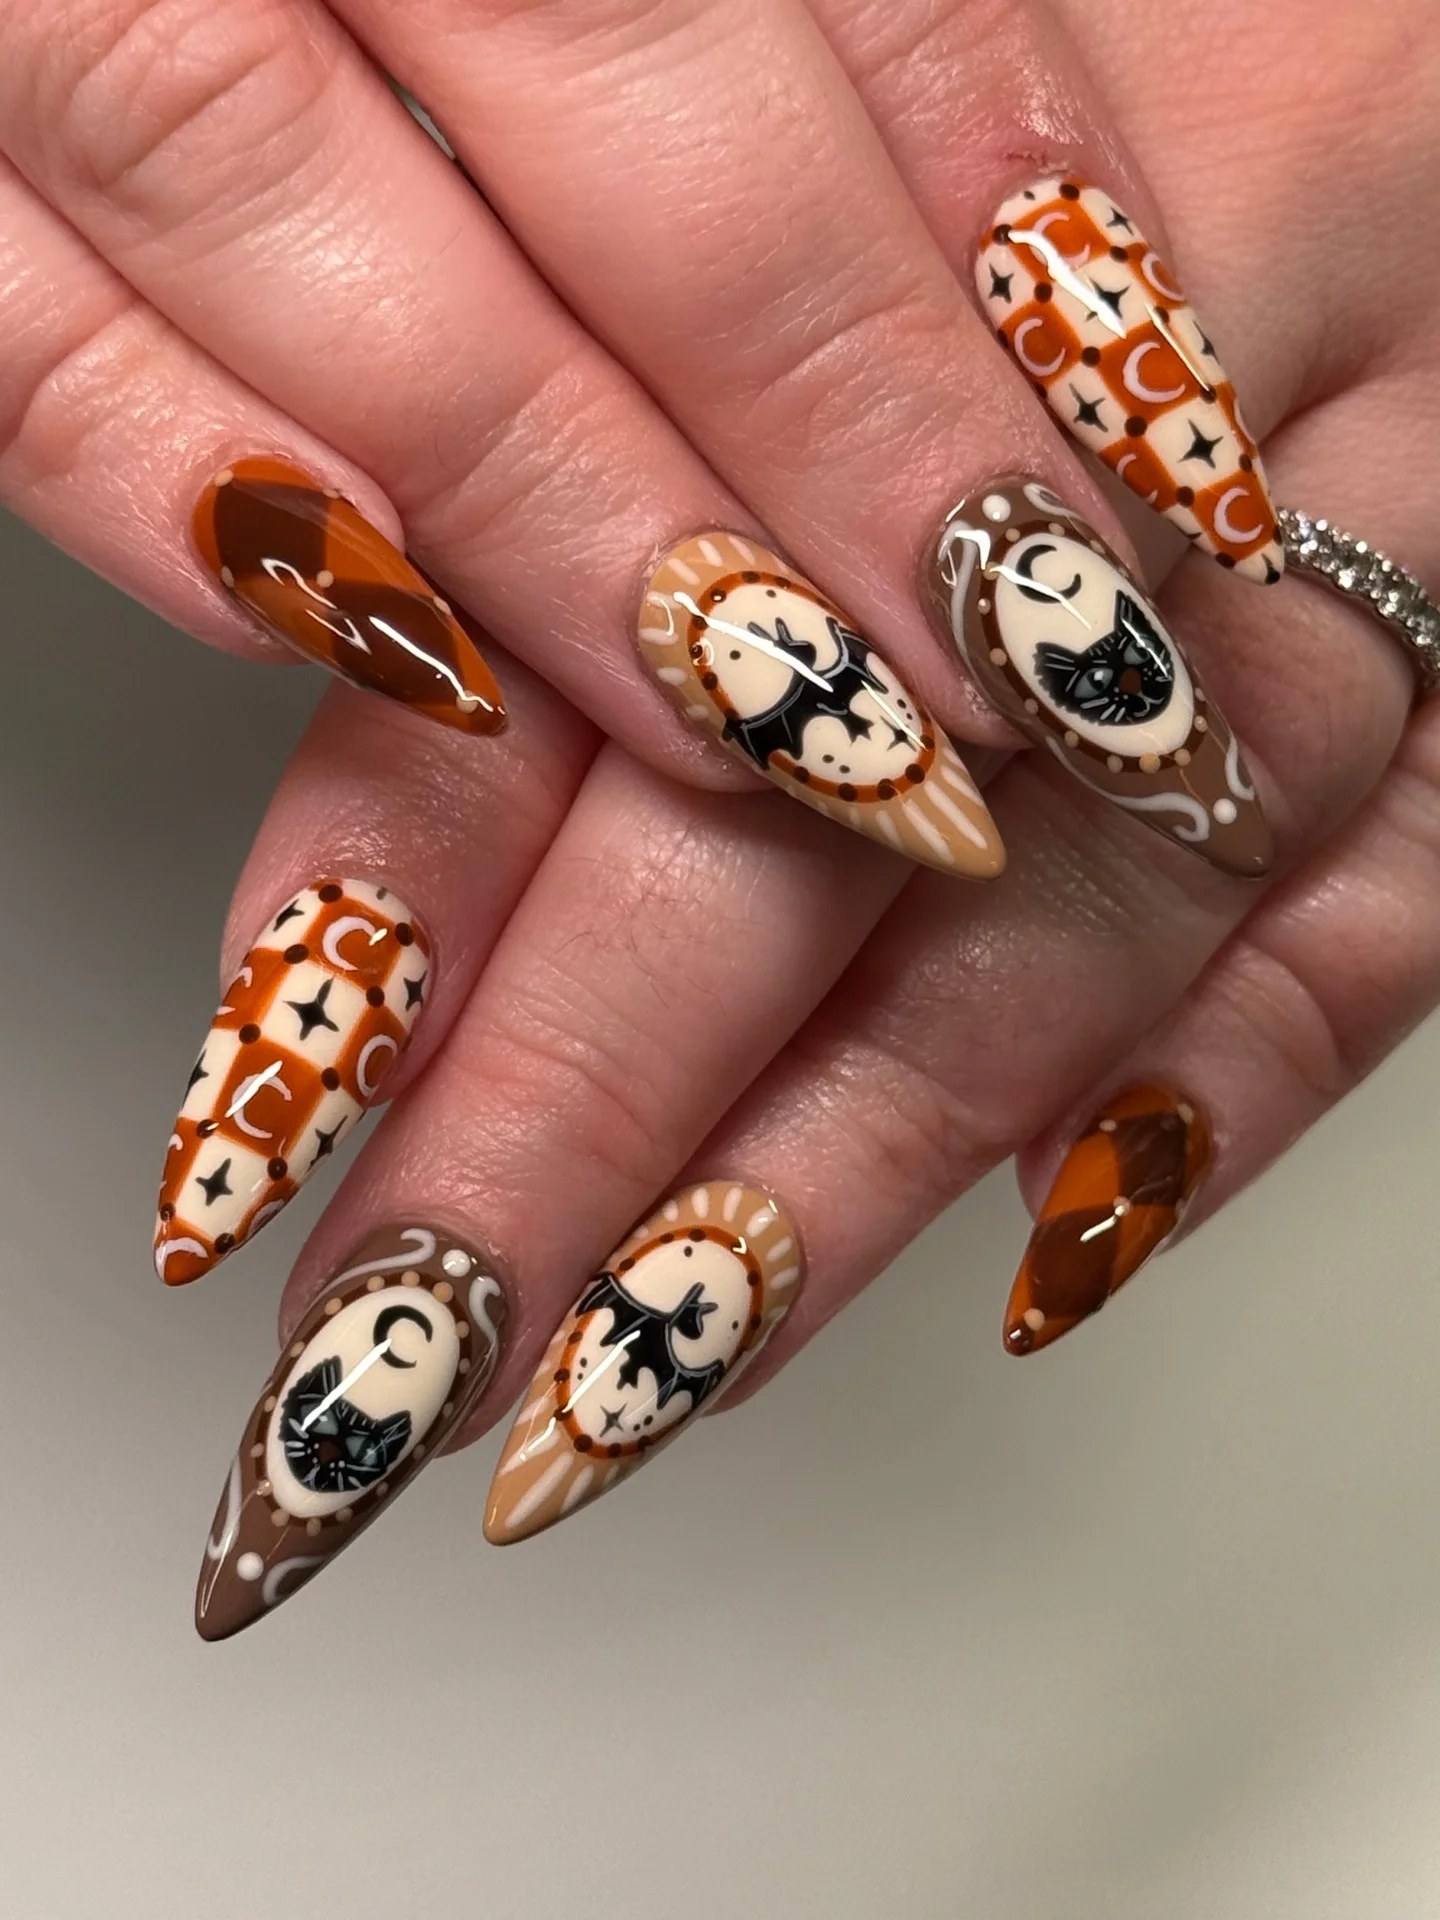
I would recreate the look with chocolate brown, burnt orange, warm nude, ivory, black, and a small amount of white gel paint. The cat faces and bats need a fine liner brush, while a dotting tool makes the tiny stars and rounded accents much easier. I would also keep a high-shine top coat nearby because the glossy surface is important here – it makes the caramel and chocolate shades look almost syrupy.
At home, I would first build the almond shape and apply the nude or brown base colors. Then I’d add the larger motifs before moving on to the tiny decorative dots and crescent shapes. The cat faces should remain relatively graphic rather than overly detailed, with the eyes and ears doing most of the work. I’d cure each color separately so the fine lines stay clean instead of bleeding into one another.
This is exactly the kind of manicure I would choose when I want Halloween energy without looking like I’m wearing a costume on my fingertips. The warm colors also make it easy to coordinate with camel coats, chocolate sweaters, denim, and gold jewelry. If you’re searching for halloween nail art almond or halloween nail art almond shape inspiration with a more grown-up personality, I would save this one immediately.
Playful Ghosts And Pumpkins On Short Nails
Short rounded nails can still tell an entire Halloween story, and I love how much personality is packed into this compact design. Deep red, soft nude, smoky taupe, black, and white create the foundation, while individual nails feature ghosts, tiny bats, pumpkins, bows, stars, and a checkerboard pattern. The variety keeps the manicure playful without making it chaotic. It is a particularly good direction for anyone searching for halloween nail art short nails that feels festive but remains practical.
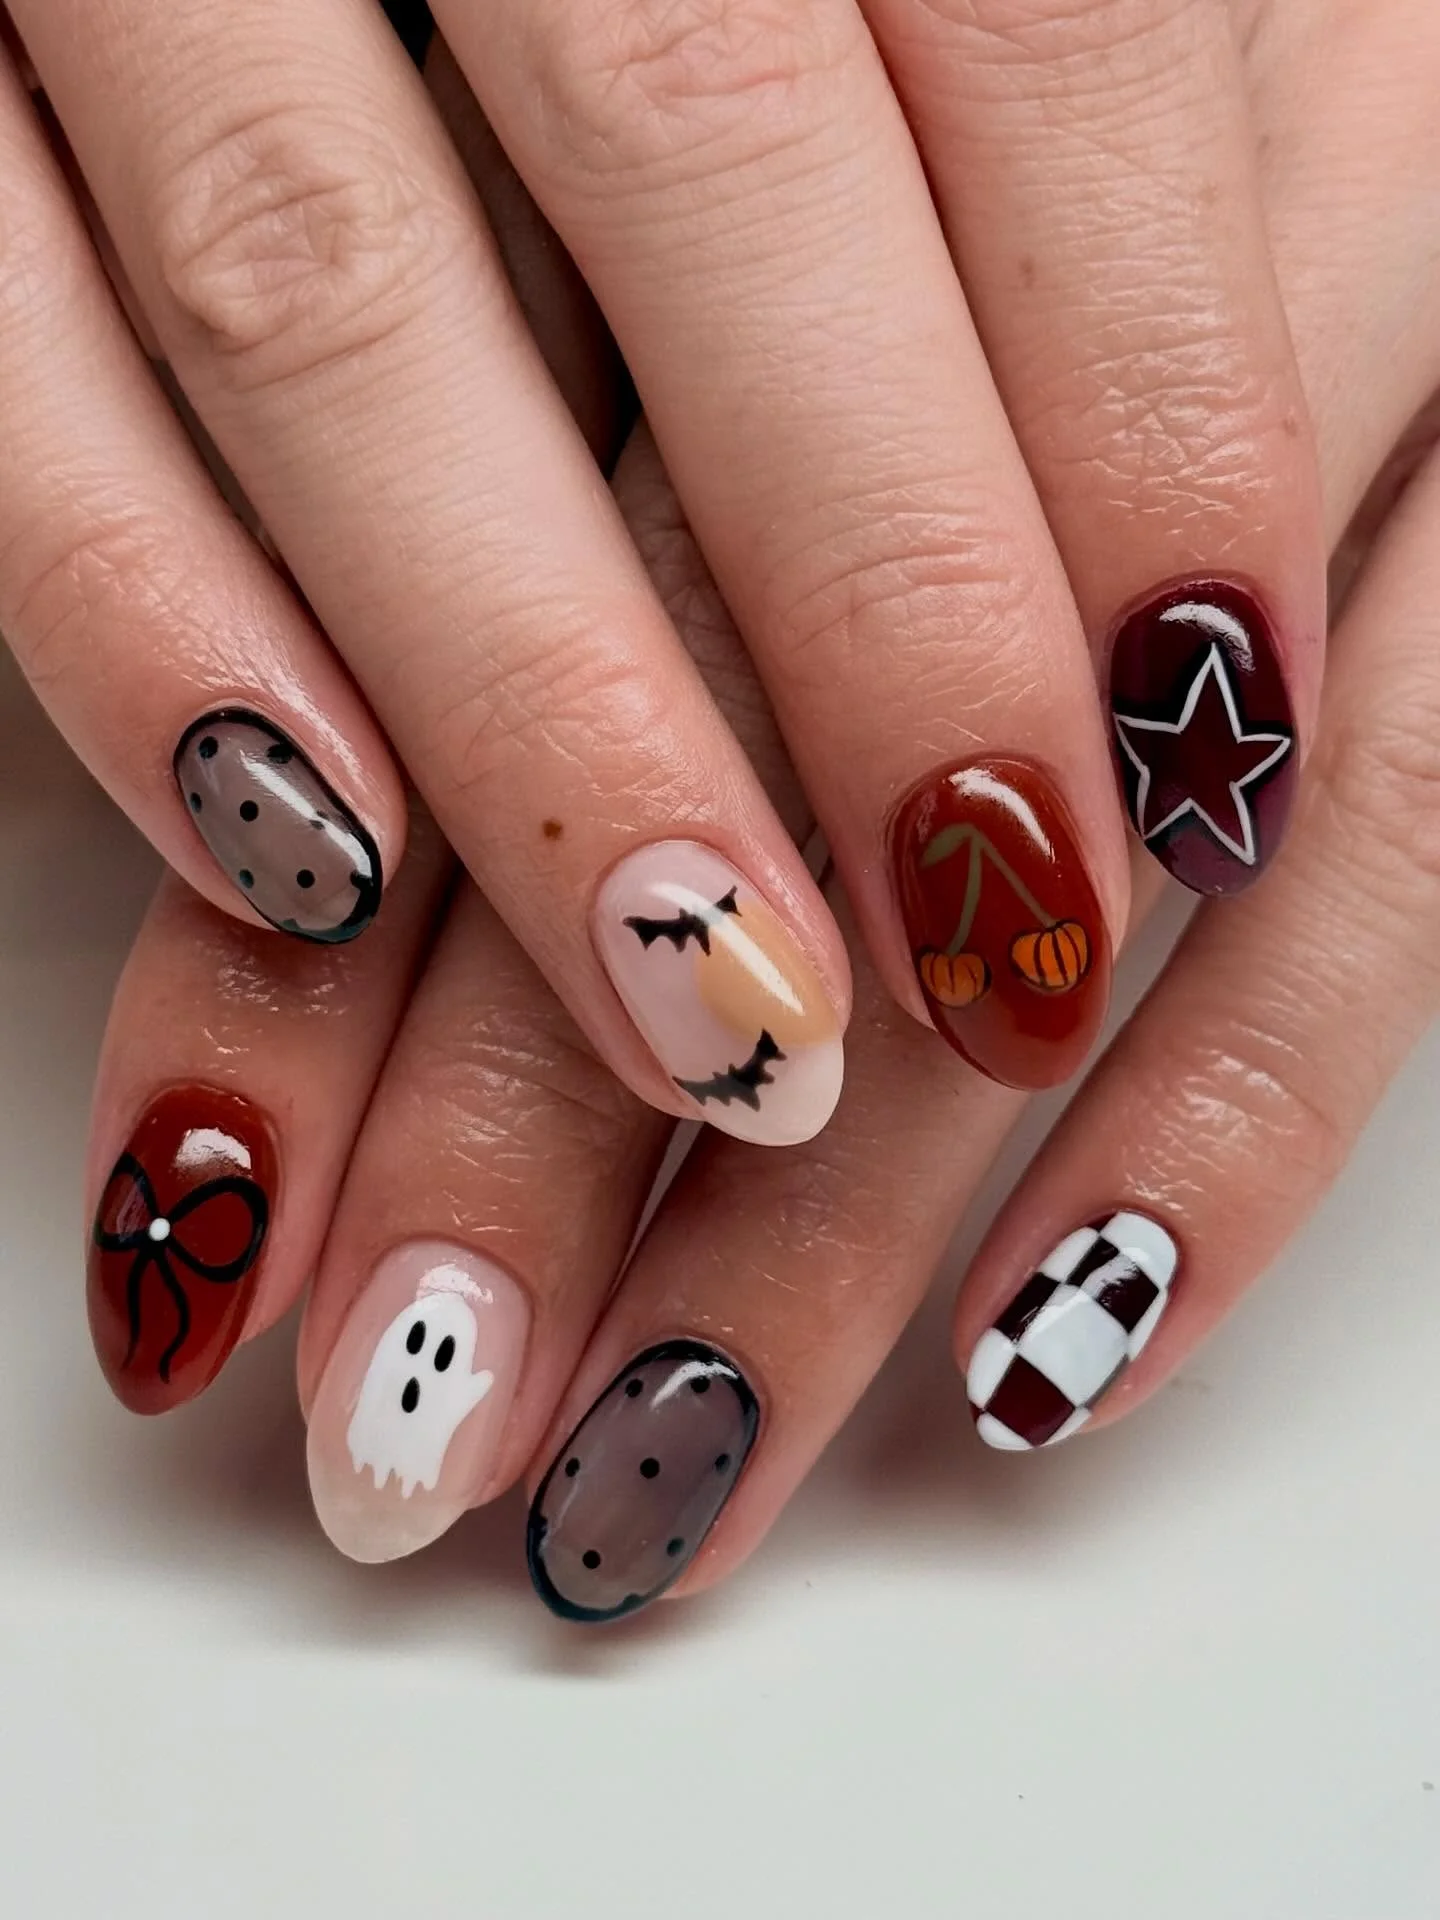
For the palette, I would choose a deep oxblood red, sheer pink-beige, smoky taupe, crisp white, and true black, adding orange only for the miniature pumpkins. A fine detail brush is enough for the bats and bow, while a small square brush can help create the checkerboard accent. I would keep the base coats relatively thin because shorter nails benefit from a clean, lightweight finish rather than too much product.
I’d start with the solid red and taupe nails, then create the soft nude bases for the illustrated accents. The little ghost is surprisingly simple – a rounded white body, a few irregular edges at the bottom, and tiny black eyes are all I need. For the checkerboard, I’d map out the squares with thin lines before filling alternate sections, and I’d leave the smallest pumpkin details until the very end.
I think this is one of those halloween nail art simple ideas that can work for almost anyone. The shorter length makes it comfortable for everyday tasks, while the mix of motifs gives it enough character for a Halloween gathering. I’d especially wear it in the weeks leading up to October 31 because it feels seasonal without becoming too literal.
Glitter Pumpkins And Bat Wing Tips
This manicure takes a more playful route with sheer nude bases, sparkling orange pumpkins, little white ghosts, and dramatic black bat-wing details. The transparent-looking base allows the natural nail tone to remain visible, which makes the stronger motifs feel lighter. I particularly like the way the orange pumpkin artwork catches the light instead of sitting flat against the nail. It is a lovely example of halloween nail art cute with a little extra sparkle.
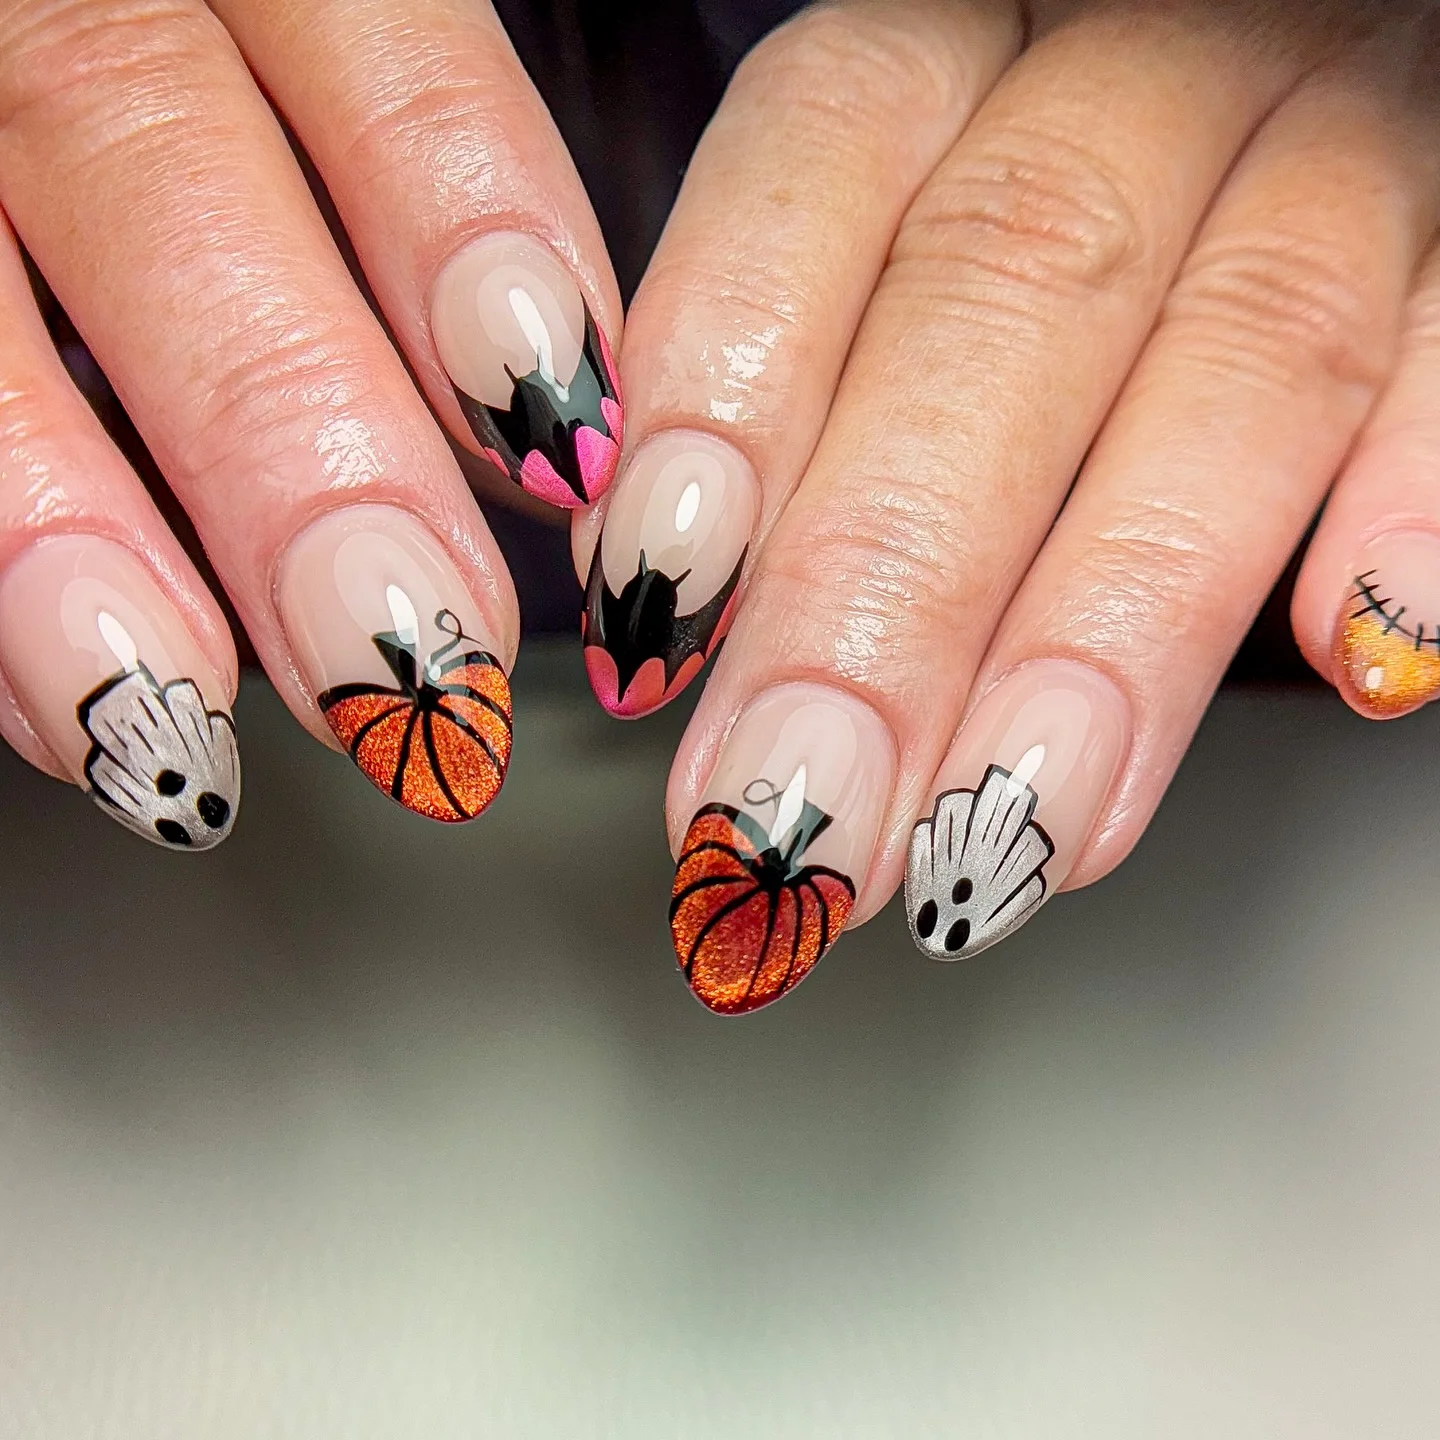
I would use a sheer milky nude gel, glittery pumpkin orange, black, white, and a muted green for the pumpkin stems. The metallic orange is the star of the palette, so I would choose a reflective or fine-glitter formula rather than a flat orange cream. A liner brush helps with the pumpkin grooves and black wing shapes, while a small detail brush is useful for the ghost figures.
The easiest way to recreate this at home is to establish the sheer nude base first and then work from the largest elements to the smallest. I’d paint the pumpkin shapes in orange, add their black outlines, and finish with the stems and curved sections. The bat-inspired tips can be created with black polish along the edge and small pointed extensions, while the white ghost should remain deliberately simple. A glossy top coat will make the glitter and illustrations look much more dimensional.
I would wear this when I wanted something unmistakably Halloween but still feminine. The sheer base makes the manicure feel lighter, while the glitter brings in that little party-season moment. It also gives me an easy way to adapt halloween nail art designs easy – I could keep only the pumpkins and one ghost, leaving the more detailed bat elements for the accent nails.
Soft Pumpkin And Ghost Nail Art With Metallic Details
I love how gentle this manicure feels compared with traditional Halloween designs. The base is a soft milky nude, and the decoration stays within a restrained palette of pumpkin orange, white, pale green, and metallic gold. Tiny ghosts appear beside miniature pumpkins and simple orange flowers, while fine gold lines, stars, and tiny metallic dots add a subtle decorative finish. This is the kind of halloween nail art simple style I would choose when I want October inspiration without a dark manicure.
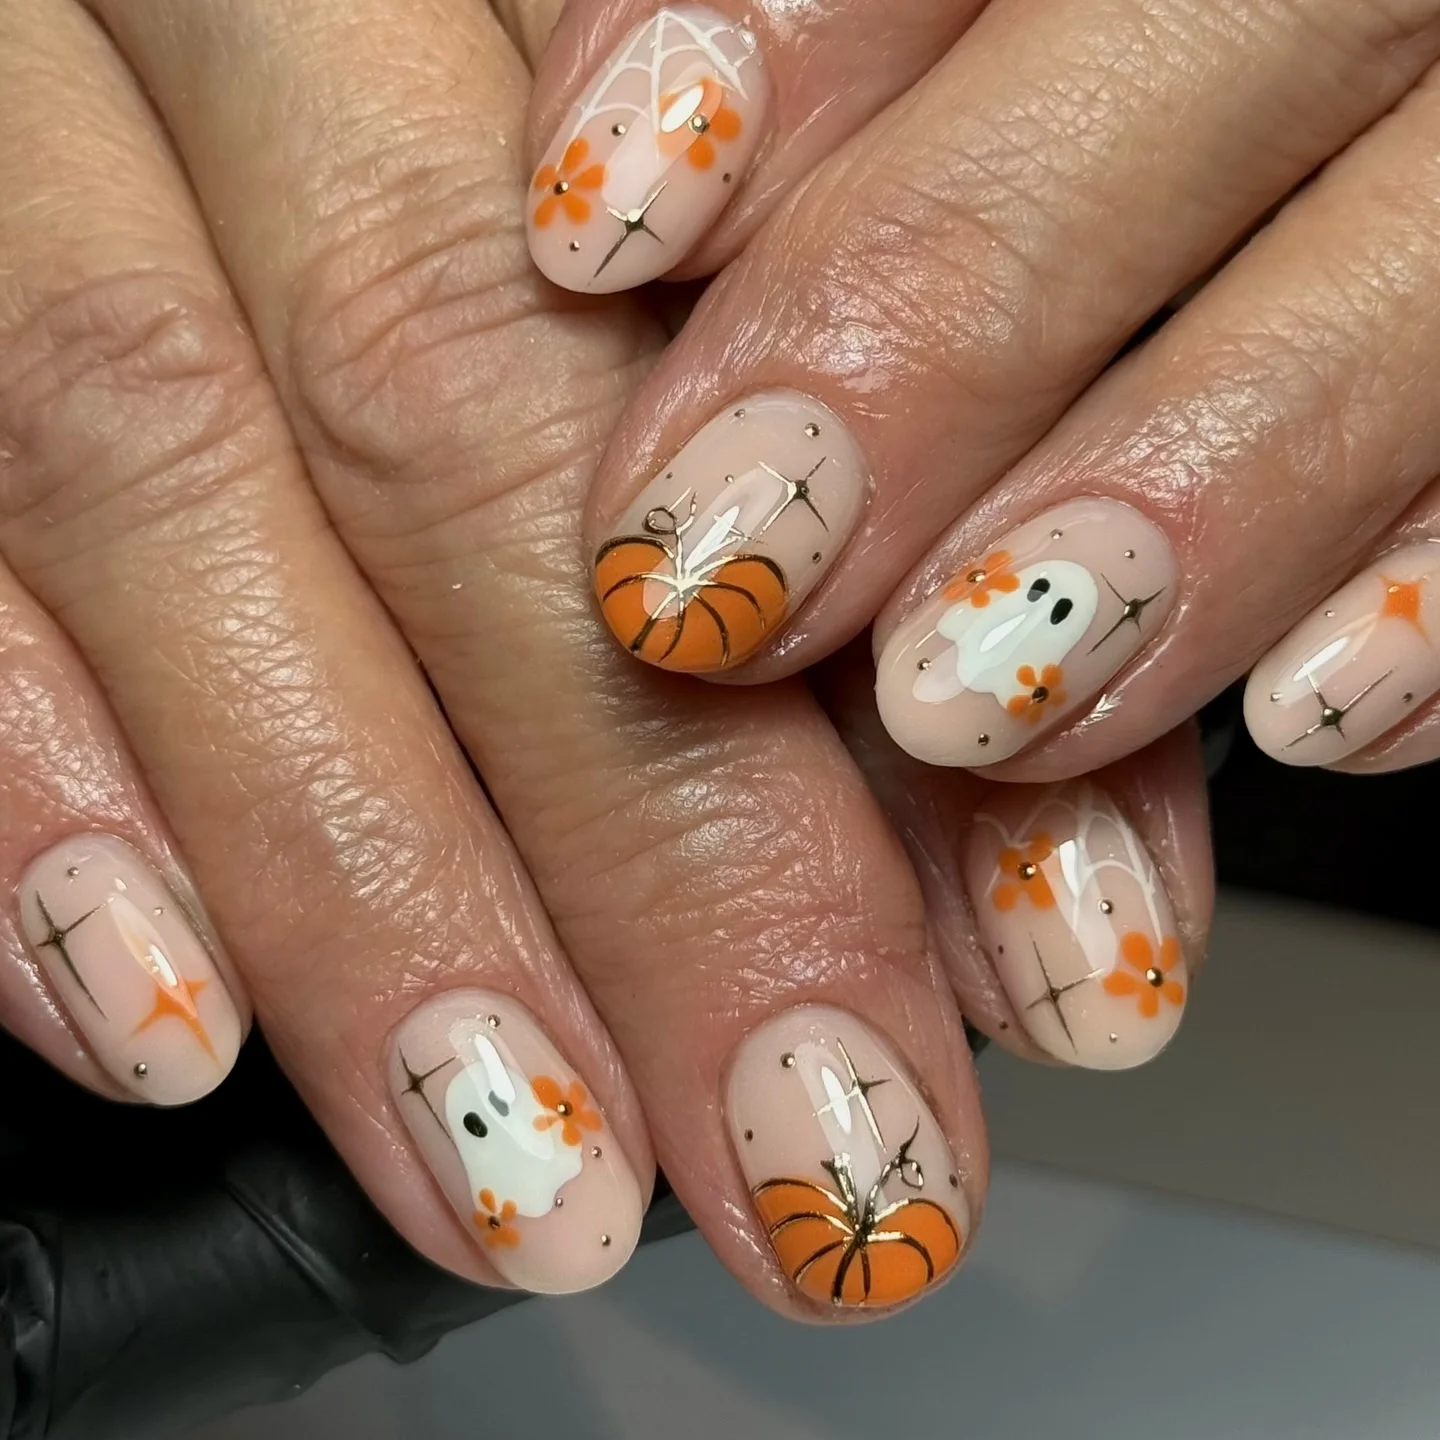
For the base, I would reach for a milky beige or translucent pink polish and pair it with pumpkin orange, soft white, and a muted sage green. The metallic elements can be created with gold gel paint or a very thin metallic striping polish. Tiny gold studs are optional, but I like them here because they echo the small decorative dots without overpowering the ghosts and pumpkins. A glossy top coat is the natural final step.
I’d create the ghosts and pumpkins first, keeping their shapes small enough to leave plenty of breathing room around them. Then I’d add the flowers and stems before introducing the metallic stars and dots. For the spiderweb accent, I’d use a very fine brush and draw only a few sections rather than covering the entire nail. That little bit of restraint is what keeps the design looking elegant.
Personally, I think this is a beautiful choice for someone who normally wears neutral nails but wants to join in with Halloween beauty. The colors are soft enough for everyday wear and would look especially pretty with cream knits, beige coats, and warm autumn makeup. If I were building a collection of halloween nail art ideas for 2026, this softer interpretation would definitely stay on my list.
Glossy Black Nails With Graphic Halloween Details
Sometimes all I want from a Halloween manicure is black polish and a few clever details. This design keeps several nails completely glossy black, then breaks up the darkness with nude accents decorated with dripping black shapes, a hypnotic black-and-white spiral, and tiny bats. The result feels sleek, slightly mysterious, and much more graphic than a traditional pumpkin manicure. For me, it is a strong option for halloween nail art black lovers who want something modern.
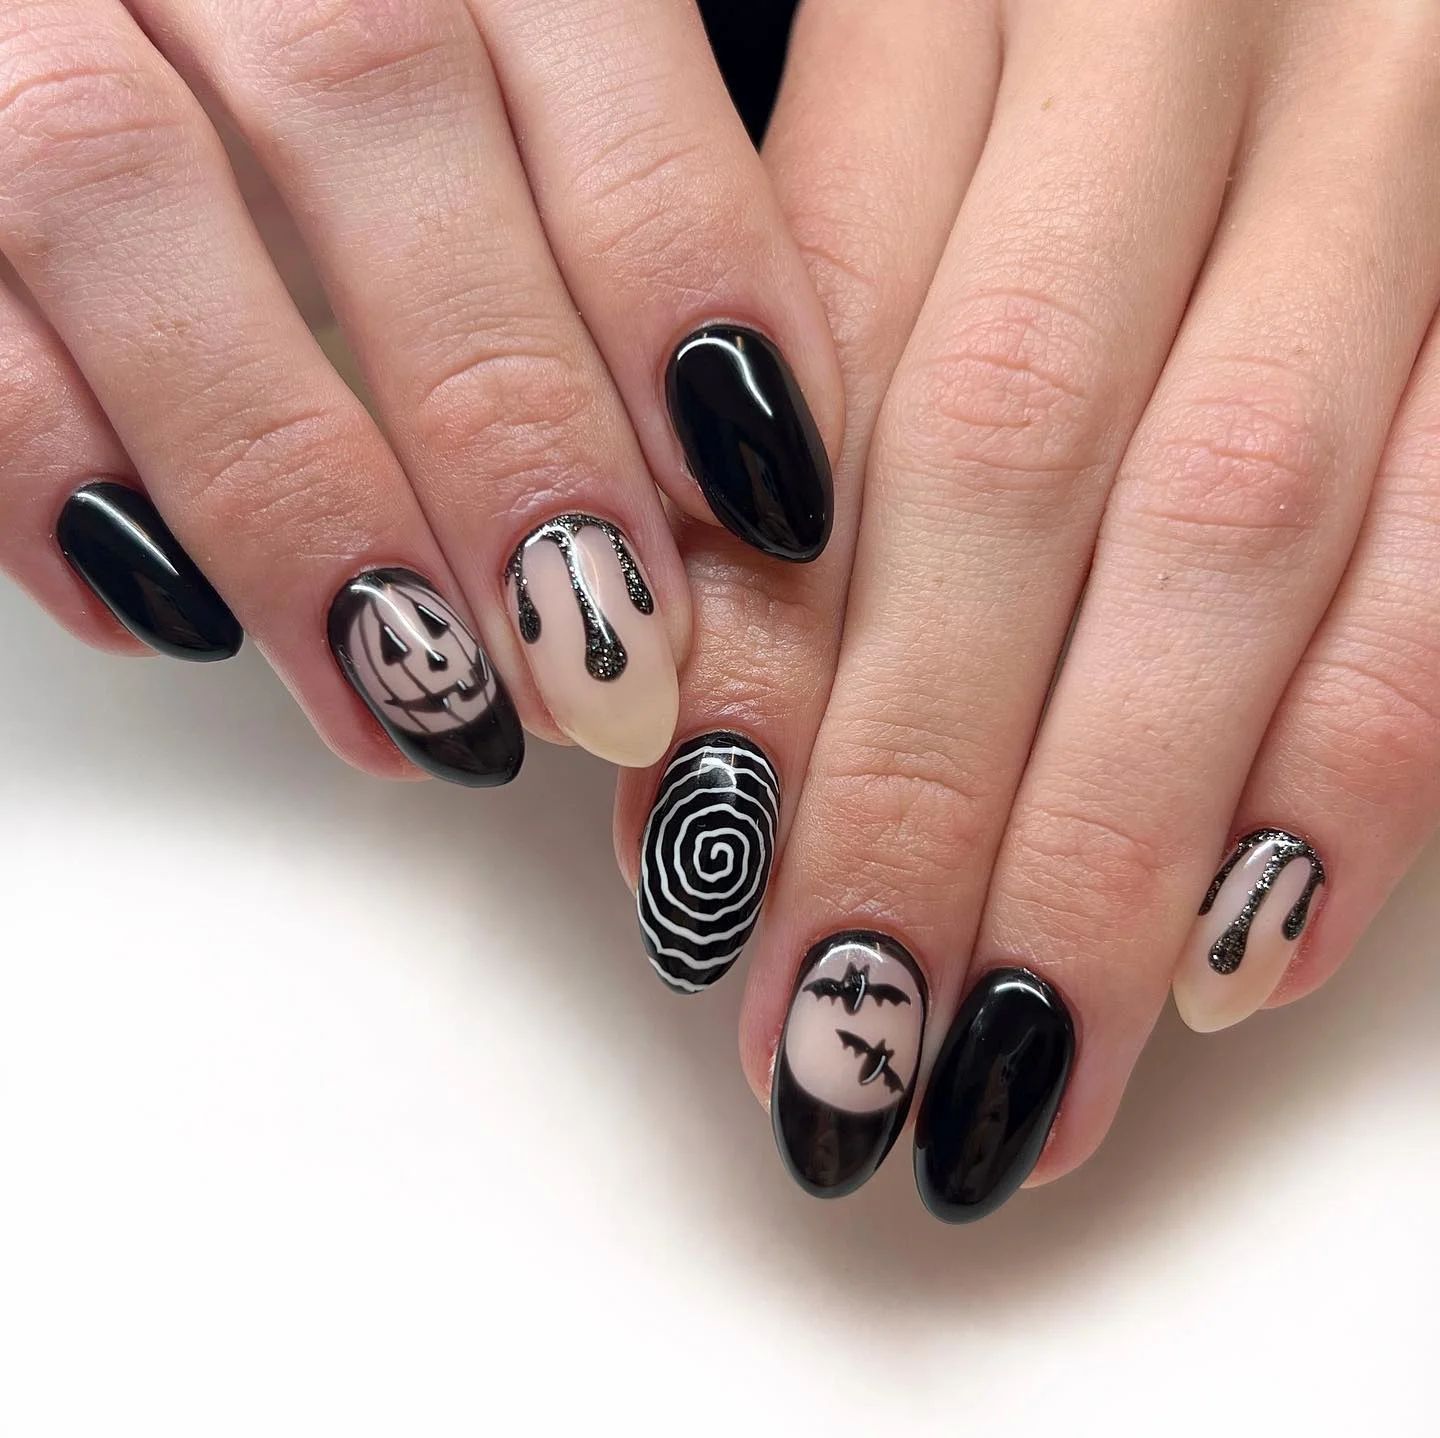
I would keep the materials minimal: an intensely glossy black gel, sheer nude or blush-beige, white gel paint, and black glitter for the raised-looking accents. A fine liner is the most important tool because the spiral and bats depend on controlled lines. I would use a glossy top coat over the black nails and a carefully leveled finish over the decorated ones so the manicure has one consistent shine.
At home, I’d begin by painting the solid black nails and curing them before moving to the accent nails. The spiral should be drawn from the center outward in one continuous controlled movement, while the bats can be reduced to two simple silhouettes with pointed wings. For the dripping accents, I’d first place the larger black drops and then connect them with thin lines. The design looks complicated at first glance, but the individual shapes are actually quite manageable.
This is probably the manicure I would pick for a black dress, leather jacket, or a night out in late October. It feels Halloween-inspired without relying on bright seasonal colors, which makes it surprisingly easy to wear beyond the holiday itself. If you’re looking for halloween nail art designs that feel sleek rather than cute, this monochrome direction has plenty of attitude.
Playful Ghost And Pumpkin Halloween Almond Nails
This manicure has that fun Halloween energy I always look for when I want my nails to feel expressive rather than overly serious. The almond shape is decorated with glossy black accents, a metallic charcoal nail, a friendly white ghost, a bright orange pumpkin character, and a nude accent framed by a black stitched border. The tiny facial expressions give the artwork a playful personality, while the darker background keeps the overall look cohesive. It is a particularly cheerful interpretation of halloween nail art almond.
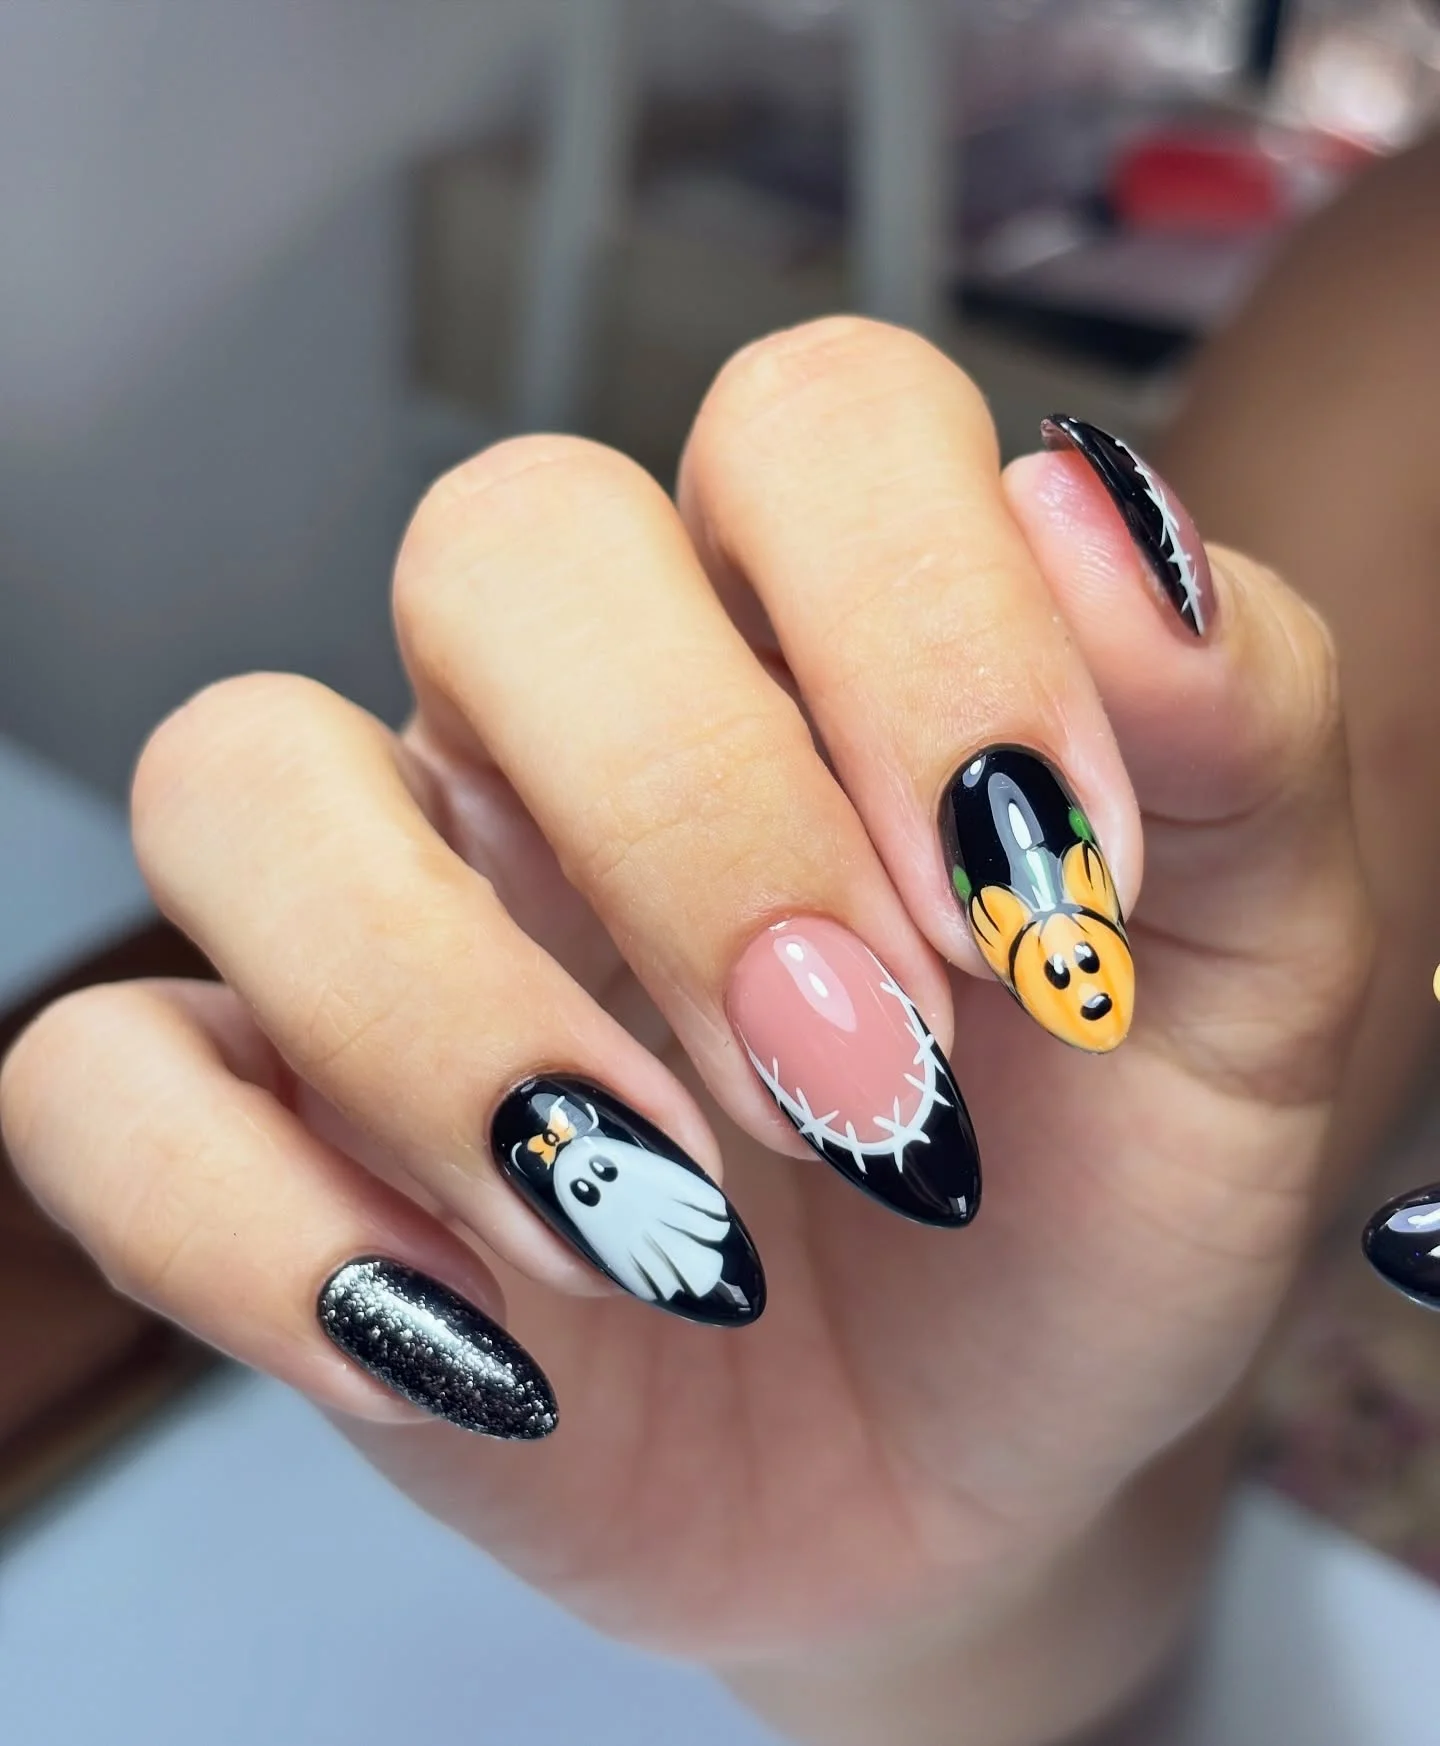
I would use glossy black, sheer blush nude, crisp white, bright pumpkin orange, muted green, and a metallic charcoal or gunmetal polish. The ghost requires only white and black, while the pumpkin needs orange, black, and a small green detail for the stem. For the stitched border, I’d use a white liner over black rather than a thick decorative strip. A high-gloss top coat would bring out the contrast between the metallic accent and the glossy cream-colored artwork.
I’d start by establishing the almond shape and applying the solid black and metallic nails. On the illustrated nails, I’d work with a nude base and build the ghost and pumpkin from simple rounded forms. The white stitched border can be created with short, evenly spaced strokes around the edge, which gives the nail a slightly handmade costume-inspired effect. I would finish the tiny facial details last because they instantly give the characters their personality.
I would absolutely wear this for a casual Halloween gathering or a night spent watching spooky movies with friends. It feels youthful without being childish, and the almond silhouette adds enough polish to balance the cartoon-like motifs. For anyone collecting halloween nail art ideas, this is also a good reminder that the best designs do not need ten completely different symbols – two or three recognizable characters, used thoughtfully, can tell the whole story.
Save Pin